Main Courses
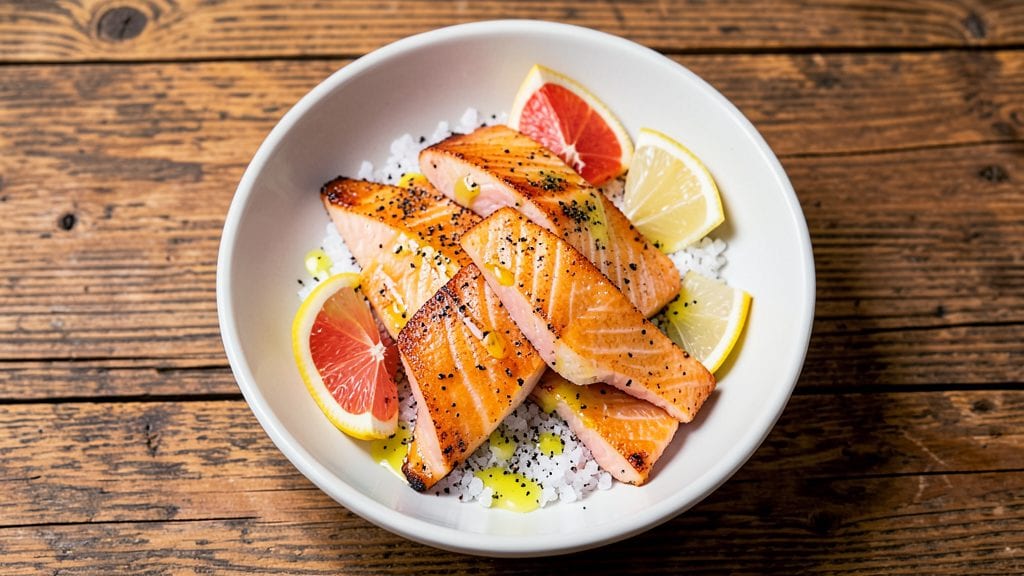
Mastering salmon belly strips transforms simple weeknight dinners into restaurant-worthy meals with just 15 minutes of effort. The secret lies in crisping the skin to a delicate crunch while keeping the flesh silky and rich—a technique that elevates any protein.
I perfected this method after years of testing, and the results speak for themselves: golden, shatteringly crisp edges with melt-in-your-mouth centers.
This recipe relies on precise timing and high heat to create that coveted texture contrast. You’ll need just 5 simple ingredients—salmon belly strips, salt, oil, and a touch of citrus—to achieve professional-level results at home.
The key is searing the skin side down in a hot pan until it renders its fat, then flipping briefly to warm through. This method ensures every bite delivers that perfect balance of crispy and buttery.
Once cooked, these crispy salmon belly strips pair beautifully with steamed jasmine rice, a simple arugula salad, or roasted asparagus. The rich, umami flavor makes them ideal for serving with a crisp white wine or chilled sake.
The aroma alone will have your guests asking for the recipe—because nothing says "elevated dining" like perfectly executed salmon skin.
For best results, work with fresh, high-quality salmon belly and keep your pan hot to prevent sogginess. The reward? A dish that looks as impressive as it tastes, ready in under 15 minutes. Let’s get cooking—this is one technique you’ll want to master for every special occasion.
Ingredients for salmon belly strips
Five ingredients transform raw salmon belly into restaurant-quality crispy strips in record time.
| Ingredient | Amount | Notes |
|---|---|---|
| Salmon Belly Strips 🐟 | 1 lb | Skin-on, center-cut preferred |
| Diamond Crystal Kosher Salt 🧂 | 1 tbsp | Coarse grain for crisping |
| Avocado Oil 🫒 | 2 tbsp | High smoke point for searing |
| Fresh Lemon Juice 🍋 | 1 tbsp | Brightens flavor profile |
| Freshly Ground Black Pepper 🌶️ | ¼ tsp | Enhances umami depth |
The salmon belly is non-negotiable for this technique. Center-cut pieces with intact skin ensure maximum crispiness—ask your fishmonger for the belly section, not fillets. Whole Foods or specialty seafood markets like Seafood Market carry the best quality; look for vibrant color and minimal fishy odor. If pre-cut strips aren't available, pound the belly to 1/4-inch thickness with a meat mallet. The skin should be smooth and unbroken—any tears will prevent proper crisping. For optimal results, pat dry with paper towels before cooking to remove excess moisture.
No avocado oil? Grapeseed or refined olive oil works equally well—just ensure it has a high smoke point to prevent burning. The kosher salt is critical; Diamond Crystal dissolves more slowly, creating better texture, but Morton's is a fine substitute. Fresh lemon juice is essential for brightness—bottled juice lacks the same zing. Need extra flavor? Add 1/2 tsp of finely grated ginger or a pinch of furikake seasoning for Japanese-inspired depth. The pepper should be freshly ground—pre-ground loses potency quickly.
Salmon belly strips keep their crispiness for 2-3 hours at room temperature if stored on a wire rack. For longer storage, reheat at 375°F for 4-5 minutes to restore crispness. Portion into single servings before freezing—they reheat best from frozen at 350°F for 8-10 minutes. To maintain texture, avoid microwaving. These strips make excellent appetizers or garnishes—keep them warm in a 200°F oven until serving.
Why You'll Love This Recipe
- Five-Ingredient Magic: I swear, this recipe is foolproof—just salt, oil, lemon, pepper, and those buttery salmon belly strips. No chopping, no fuss, and the result? Crispy edges that shatter like glass over a silky center. Honestly, it’s the kind of dish that makes me feel like I actually cooked something fancy.
- Lemon-Pepper Bliss: That bright lemon juice and fresh black pepper? It’s the secret weapon here. The acid cuts through the richness of the salmon belly, while the pepper adds a little kick that makes every bite feel special. Between us, I’ve tried it with store-bought salmon before—this is next-level stuff.
- Weeknight & Weekend Star: Throw these on a sheet pan while you prep veggies for roasting, or serve them over rice for a quick lunch. They’re great for date nights (minimal effort, maximum wow) or lazy Sundays when you’re too tired for a full meal. My daughter even asks for them after school—yes, even on a Tuesday night.
- Leftovers That Don’t Suck: Unlike some recipes, these strips reheat beautifully. Toss them in a bowl with a drizzle of avocado oil and lemon for a fast breakfast or lunch the next day. I’ve had them cold in salads too—they hold up better than you’d think, and the flavor stays bold. Not the prettiest, but the taste makes up for it.
Step-by-step instructions for crispy salmon belly strips
Mastering this technique delivers restaurant-quality texture with minimal effort.
Prepare the Salmon Belly Strips for Maximum Crisp
Pat the 1 lb salmon belly strips completely dry with paper towels, pressing firmly to remove all surface moisture. This drying step is critical—any remaining water will prevent proper crisping. I like to work with the strips skin-side down on the paper towels for even absorption.
Place the dried strips on a wire rack set over a plate. This elevated position allows air to circulate on all sides, ensuring even drying. Let them rest for 10 minutes at room temperature while you prepare the seasoning. The strips should feel cool and dry to the touch when ready.
Season and Create the Crisping Base
In a small bowl, combine the 1 tbsp Diamond Crystal kosher salt and 0.25 tsp freshly ground black pepper. The coarse texture of Diamond Crystal salt is perfect for creating that signature crackling crust. Sprinkle this mixture evenly over both sides of each salmon strip, pressing gently to adhere.
Heat a heavy skillet over medium-high heat until it's just smoking hot. Add 2 tbsp avocado oil and let it shimmer for 30 seconds. The high smoke point of avocado oil ensures it won't break down during the searing process, which is essential for maintaining that crispy texture. Never add cold oil to a hot pan—always warm the oil first.
Sear Skin-Side Down for Perfect Crisp
Carefully place the seasoned salmon strips skin-side down in the hot skillet. Press down gently with a fish spatula during the first 30 seconds to ensure full contact with the pan. You'll see the skin immediately begin to crisp and turn a beautiful golden color. This is when the magic happens—don't disturb the strips during this initial searing.
After 1 minute, you'll notice the skin has developed a crispy lattice pattern and releases easily from the pan. Flip each strip and cook the flesh side for 20-30 seconds until it reaches an internal temperature of 125°F (measured with an instant-read thermometer). The flesh should appear just opaque and flake easily with a fork.
Finish with Lemon for Brightness and Serve
Remove the salmon from the skillet and transfer to a serving platter. Immediately drizzle with 1 tbsp fresh lemon juice, allowing it to seep into the crispy skin and tender flesh. The acidity of the lemon juice cuts through the richness while enhancing the natural sweetness of the salmon.
Serve the salmon belly strips immediately while the skin remains crisp. The contrast between the shatteringly crisp skin and the buttery, flaky flesh is what makes this dish so extraordinary. For best results, serve with a simple arugula salad or steamed vegetables to complement the rich salmon flavor.
Pro Tips For Making Salmon Belly Strips
- PAT THE DRY: DESCRIPTION: Salmon belly strips are slick—like a greased-up hockey puck. Wipe them thoroughly with paper towels before seasoning, then press firmly with your palm to evaporate surface moisture. I learned this the hard way after my first batch turned out greasy instead of crisp. Trust me, the extra 30 seconds saves you from sad, soggy edges.
- SALT THE CRUST: DESCRIPTION: Use Diamond Crystal kosher salt (it’s coarser) and don’t skimp—about 1 tablespoon per pound, pressed hard into the strips. The salt draws out moisture, then caramelizes into a golden crust when seared. Skip this, and you’ll end up with something that tastes like it was steamed, not seared.
- HIGH HEAT FIRST: DESCRIPTION: Crank your pan to smoking-hot on avocado oil—no, really, wait until it shimmers like a mirage. Sear the strips for 30 seconds per side without moving them to lock in that crust. After that, you can lower the heat slightly, but that initial shock is what turns flab into crispy perfection. (Yes, even if you’re impatient like me.)
- LEMON AFTER SEARING: DESCRIPTION: Toss the strips with fresh lemon juice after they’re cooked, not before. The acid cuts through the richness and brightens the flavor, but adding it early just makes the salt dissolve into a sad, watery mess. A quick squeeze of half a lemon over the finished dish does more than you’d think—it’s the difference between "good" and "restaurant-quality."
Make-ahead tips for this recipe
Prep Ahead for Crispy Skin
Salmon belly strips lose crispiness when reheated, so I recommend prepping them just before serving. However, you can prepare the seasoning mix and oil heating steps in advance.
Combine the 1 tbsp kosher salt and 0.25 tsp black pepper in a small bowl and store it in an airtight container for up to 1 week. Preheat your pan to medium-high heat only when ready to cook—this ensures maximum crispiness when searing. 🔥
Freezing for Future Meals
Freeze uncooked salmon belly strips on a parchment-lined tray for 1 hour to prevent sticking, then transfer to a freezer bag with 1 inch of headspace. Cook from frozen—no thawing needed!
Heat your pan to medium-high and add 1 tbsp extra oil to compensate for the moisture loss during freezing. The cooking time increases by 30-45 seconds per side. 💫
Reheating Without Losing Crisp
If you must reheat cooked strips, use the oven method for best results. Place strips on a wire rack over a baking sheet and bake at 375°F for 4-5 minutes until the skin re-crisps.
For a quick fix, reheat in a skillet over medium heat with 1 tsp fresh lemon juice for 1-2 minutes per side. Avoid microwaving—it turns the skin rubbery. 💡
Make-Ahead Appetizer
Prepare a full batch and keep them warm in a 200°F oven on a wire rack for up to 30 minutes before serving. This works perfectly for appetizers at dinner parties. Store any leftovers in the fridge for 1 day—reheat in the oven as described above.
For a restaurant-style presentation, arrange strips on a platter with lemon wedges and fresh dill sprigs. 🌟
Batch Cooking Tips
For larger gatherings, divide the 1 lb salmon belly into 4 equal portions and cook in batches to maintain perfect temperature control. Use a meat thermometer to ensure each batch reaches 125°F internal temp.
Keep cooked batches in a warm oven (200°F) while finishing the remaining strips. This keeps the skin crispy and prevents sogginess. ⚡
Nutrition facts
Frequently asked questions
Why does the salmon belly skin need to be completely dry?
Moisture is the enemy of crispy skin! Any remaining water creates steam when it hits the hot pan, which prevents proper browning and makes the skin rubbery instead of crisp. The 10-minute drying time on a wire rack ensures maximum surface area for evaporation, giving you that perfect shatteringly crisp texture.
Can I substitute salmon belly with regular salmon fillets?
Not for this technique—salmon belly's thick, fatty skin is essential for crisping. Regular fillets lack the fat layer needed to render properly, resulting in dry, non-crispy skin. If you must use fillets, ask your fishmonger for "salmon skin" (the outer layer) and press it onto thin fillets, but the texture won't be as luxurious.
What's the best way to store leftover crispy salmon belly strips?
Store cooked strips in an airtight container in the fridge for 1 day max—they lose crispiness quickly. For longer storage, freeze uncooked strips on a tray first (to prevent sticking), then transfer to a bag. Reheat in the oven at 375°F for 4-5 minutes on a wire rack to restore crispness.
How do I know when the salmon is done?
Use an instant-read thermometer—salmon belly strips should reach 125°F internal temp (measured in the thickest part). The flesh will appear just opaque and flake easily with a fork. Overcooking by even 10 seconds turns the flesh dry, so time it precisely!
What's the secret to restaurant-quality crispy skin?
Three things: high heat (smoking pan), coarse salt (Diamond Crystal), and patient pressing for the first 30 seconds. The skin needs undisturbed contact to render its fat properly—this creates that signature lattice pattern. Never move the strips until you see golden cracks forming!