Main Courses
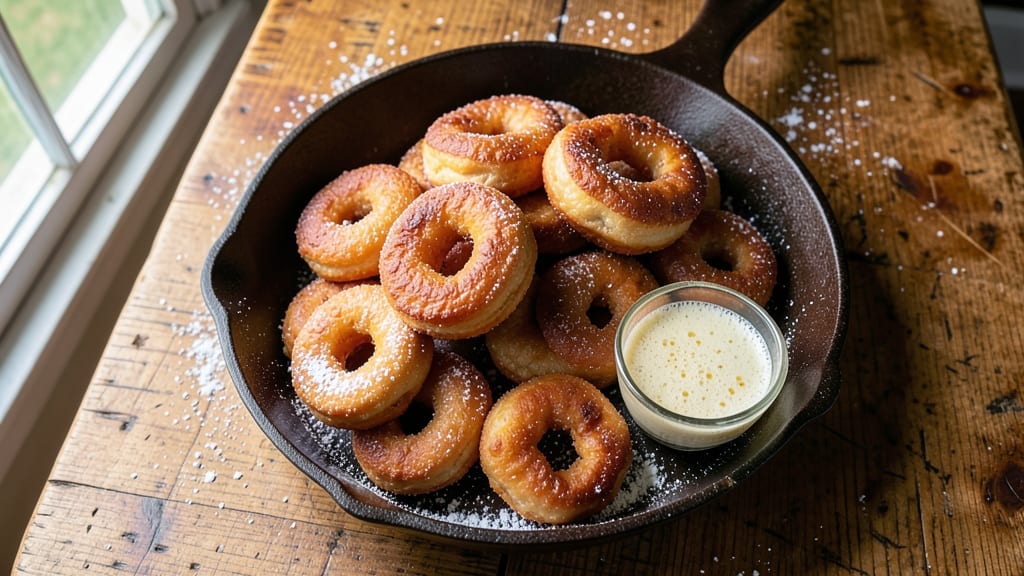
This Amish donut recipe brings the warmth of a Pennsylvania farmhouse kitchen to your own table, where golden-fried donuts meet a smooth vanilla glaze that’s become a family tradition.
The secret lies in the simple, time-honored method—yeast-leavened dough that rises slowly, creating light, pillowy donuts with just the right crispness when fried. I first learned this recipe from an Amish baker who swore by the importance of patience, especially when letting the dough rest overnight in the refrigerator.
The dough itself is straightforward: flour, sugar, yeast, and butter come together in a process that feels almost meditative, with no fancy equipment required. What sets these donuts apart is the frying technique—hot oil at just the right temperature ensures a perfect golden brown without burning.
Once fried, the donuts absorb the vanilla glaze beautifully, creating a sweet, creamy finish that pairs perfectly with a dusting of powdered sugar or a sprinkle of cinnamon.
What you’ll end up with is a batch of donuts that taste like a homemade treat straight from an Amish community gathering—light, tender, and sweet without being overly rich. The glaze adds that extra touch of indulgence, making these donuts perfect for breakfast, dessert, or even a mid-afternoon pick-me-up.
Whether you’re serving them fresh from the fryer or reheating leftover donuts the next day, they’ll bring a taste of tradition to your kitchen.
These donuts are especially meaningful during holiday gatherings or when you want to share a piece of Amish heritage with friends and family. The recipe scales easily, so you can make a small batch for a cozy morning or double it for a crowd.
Let’s get started on creating donuts that taste like home.
Ingredients for amish donut
Flour, yeast, and butter bring Amish tradition to your kitchen—simple ingredients for golden, pillowy donuts.
| Ingredient | Amount | Notes |
|---|---|---|
| All-Purpose Flour 🌾 | 4 cups | Sifted for light texture |
| Granulated Sugar 🍚 | ½ cup | White sugar preferred |
| Active Dry Yeast 🍞 | 2 ¼ tsp | Fresh yeast works too |
| Unsalted Butter 🧈 | ½ cup | Cold, cubed for dough |
| Large Eggs 🥚 | 2 whole | Room temperature |
| Milk 🥛 | ½ cup | Warm, not hot |
| Salt 🧂 | 1 tsp | Kosher or sea salt |
| Vegetable Oil 🫒 | 3 cups | For frying, 350°F |
| Powdered Sugar 🍚 | 2 cups | For glaze |
| Vanilla Extract 🍯 | 1 tbsp | Pure vanilla preferred |
| Milk 🥛 | ¼ cup | For glaze, room temp |
| Ground Cinnamon 🌿 | ½ tsp | For optional garnish |
The yeast is the heart of these donuts—Bob’s Red Mill or King Arthur brands work best for consistent rising. If your yeast is old, test it in warm milk first (should foam in 5-10 minutes). The butter should be cold when cutting into the dough—this creates flaky layers that make the donuts light. For the flour, White Lily is a classic choice, but any all-purpose works. The key is sifting it before mixing to avoid dense donuts. I always measure my flour by scooping and leveling—don’t pack it down or you’ll end up with heavy donuts.
No vanilla extract? Vanilla bean paste works too, or even a splash of vanilla sugar if that’s what’s in your pantry. Running short on powdered sugar? Confectioners’ sugar is the same thing—just make sure it’s finely ground. The milk for the dough can be any kind, but whole milk gives the best texture. For the glaze, if you don’t have vanilla extract, a pinch of vanilla sugar or even a drop of vanilla-flavored almond extract (use sparingly!) will work. The cinnamon is totally optional, but it’s worth keeping on hand for that classic Amish touch—just sprinkle it on right after glazing while the donuts are still warm.
The dough keeps beautifully in the fridge for up to 48 hours, which is why I always make a double batch. Once fried, store the donuts in an airtight container with parchment paper between layers—they’ll stay fresh for 3 days. To reheat, pop them in a 350°F oven for 5 minutes or microwave for 20 seconds. The glaze hardens as it cools, so I always reheat the donuts slightly before serving to bring back that fresh-from-the-fryer feel. Freeze any extras on a tray first, then transfer to a bag—they’ll keep for up to 3 months.
Why You'll Love This Recipe
- No Yeast Fuss: I swear by this recipe because it skips the messy yeast proofing—just mix, let it rest, and fry. The dough comes together faster than my coffee brews, and honestly? That’s all I ask for on a Saturday morning.
- Butter-Kissed Magic: That rich, browned butter in the dough? It’s the secret weapon. The donuts get this perfect balance of crispy outside and tender inside, with just enough sweetness from the sugar to make them dangerously addictive.
- Breakfast or Dessert: Serve them warm with coffee for a hearty breakfast, or dust with powdered sugar for a treat that feels special. I’ve even frozen extras and reheated them—no one ever guesses they’re not fresh.
- Pantry Staples Only: Flour, sugar, butter, eggs—these are ingredients I already have. No fancy substitutions, no last-minute grocery runs. And because they freeze well, I can make a big batch, save half, and still have donuts for weeks.
Step-by-step instructions for homestyle Amish donuts
Here's the straightforward method to create tender, fluffy donuts that'll have everyone asking for seconds.
Activate the Yeast for Perfect Rise
In a small bowl, combine the 0.5 cup warm milk (about 110°F) with 0.5 cup granulated sugar and 2.25 teaspoons active dry yeast. Let this mixture sit for 5-10 minutes until it becomes frothy and bubbly—this confirms your yeast is alive and ready to work its magic. The bubbles indicate the yeast is actively fermenting, which is crucial for light, airy donuts.
If the mixture doesn't bubble after 10 minutes, your yeast might be expired. In that case, start fresh with a new packet. This step sets the foundation for your donuts' texture, so don't rush it. Once you see those bubbles, you're ready to move forward with confidence.
Mix the Dough for Fluffy Texture
In a large mixing bowl, whisk together the 4 cups all-purpose flour and 1 teaspoon salt. Create a well in the center and pour in the yeast mixture along with the 2 whole large eggs and 0.5 cup cold unsalted butter, cut into small cubes. Using a wooden spoon or dough whisk, gently mix until the ingredients begin to come together.
Once the dough starts forming, switch to your hands and knead on a lightly floured surface for 5-7 minutes until smooth and elastic. The dough should be soft but not sticky—if it's too sticky, add a little more flour 1 tablespoon at a time. This kneading develops the gluten, which gives your donuts that classic Amish donut texture. Wrap the dough in plastic wrap and let it rise in a warm place for 1 hour or until doubled in size.
Shape and Proof the Donuts
Punch down the risen dough and turn it out onto a lightly floured surface. Roll it out to about ½-inch thickness. Cut out donuts using a 3-inch round cutter for the donuts and a 1-inch cutter for the holes. Place the donuts on a floured baking sheet, cover with a clean kitchen towel, and let them proof for another 30 minutes—this second rise ensures they'll be light and airy when fried.
While they're proofing, heat 3 cups vegetable oil in a deep fryer or heavy pot to 350°F. Use a deep-fry thermometer to monitor the temperature—this is critical for even cooking. The oil should be hot enough to sizzle when you drop in a small piece of dough. This step is where the magic happens, so keep the oil at the right temperature for perfect donuts every time.
Fry to Golden Perfection
Carefully slide 2-3 donuts into the hot oil, being careful not to overcrowd the pot. Fry for 1-2 minutes per side until they're golden brown all over. Use a slotted spoon to turn them gently—don't press down, or they'll flatten. The donuts are done when they float to the surface and develop a beautiful golden crust.
As you fry each batch, transfer the donuts to a paper towel-lined plate to drain excess oil. Keep the oil at 350°F between batches, adding more if needed. This high heat creates that classic crispy exterior while keeping the inside tender. Work in batches to avoid dropping the oil temperature, which would result in greasy donuts.
Prepare and Apply the Vanilla Glaze
While the donuts are still warm, whisk together 2 cups powdered sugar, 1 tablespoon vanilla extract, and 0.25 cup milk in a bowl until smooth. The glaze should be thick enough to coat the back of a spoon but still drizzle easily. If it's too thick, add a splash more milk 1 teaspoon at a time until you reach the perfect consistency.
Drizzle the glaze over the warm donuts, letting it drip down the sides. For an extra touch, sprinkle with 0.5 teaspoon ground cinnamon while the glaze is still wet. Serve immediately while the glaze is shiny and the donuts are at their peak texture—crispy on the outside, soft and pillowy within. These donuts are best enjoyed fresh out of the fryer!
Pro Tips For Making Amish Donut
- Test Your Yeast First: Skip the guesswork—mix 1 packet yeast with ¼ cup warm (not hot) water and 1 teaspoon sugar. If it bubbles within 5 minutes, your yeast is alive. Dead yeast means starting over, and nobody wants to waste dough.
- Cut Cold Butter: Use a chilled butter knife (literally, stick it in the freezer for 5 minutes) to slice that unsalted butter into the flour. Cold butter creates flaky layers—warm butter just makes dense, greasy donuts. Trust me, your future self will notice.
- Don’t Overmix the Dough: Mix the dough just until it comes together. Overworking it develops gluten, and you’ll end up with tough, chewy donuts instead of light, pillowy ones. Stop when it’s shaggy—it’ll smooth out during the rise.
- Use a Thermometer for Frying: Shoot for 350°F—any hotter and the outside burns before the inside cooks. A deep-fry thermometer is your friend here; eyeballing it leads to either raw centers or crispy husks. (Yes, even if you’re impatient like me.)
Common mistakes when making great amish donut
Yeast Activation Fails
Skipping the 5-10 minute yeast activation test is the #1 mistake—expired yeast won’t bubble, leading to dense, flat donuts. I’ve seen beginners skip this step and wonder why their donuts didn’t rise. Always test your yeast in warm milk first.
If it doesn’t foam, toss it and start fresh. The 110°F milk is crucial too—hotter milk kills the yeast, while cooler milk slows activation. 🌡️
Overcrowding the Fryer
Dropping more than 2-3 donuts at once lowers oil temperature, causing greasy donuts instead of crispy ones. I learned this the hard way—my first batch came out soggy because I overcrowded.
Maintain 350°F oil temp between batches by adding more oil if needed. A deep-fry thermometer is worth its weight in gold here.
Skipping the Second Rise
Many recipes mention proofing, but the 30-minute second rise after shaping is often overlooked. This step ensures light, airy donuts. Without it, you’ll get dense donuts that sink in the oil. Cover them with a damp towel during proofing to maintain moisture—this helps them rise evenly. Don’t rush this step!
Incorrect Oil Temperature
Frying at 375°F instead of 350°F burns the outside before the inside cooks, while 325°F makes greasy donuts. I use a ThermoWorks Smoke thermometer to monitor temps precisely.
The donuts are done when they float and turn golden brown—about 1-2 minutes per side. A thermometer prevents guesswork and ruined batches.
Glaze Consistency Errors
Too-thick glaze clumps and doesn’t coat properly, while too-thin glaze runs off. I’ve seen glaze pools form at the bottom of plates because it was too runny. The perfect consistency coats the back of a spoon but drizzles smoothly.
Adjust with 1 tsp milk at a time—don’t rush this. Also, apply glaze to warm donuts (not hot) to prevent melting.
Under-Kneading the Dough
Kneading for less than 5 minutes results in weak gluten structure, leading to donuts that fall apart when frying. Over-kneading (beyond 7 minutes) makes the dough tough. The dough should be smooth, elastic, and slightly tacky but not sticky.
If it sticks to your hands, add 1 tbsp flour at a time—this is key for that classic Amish donut texture. 💪
Nutrition facts
Frequently asked questions about homemade Amish donuts
Why do Amish donuts need an overnight rise?
The overnight rest in the refrigerator develops deeper flavor and creates a lighter texture. The slow fermentation allows the yeast to work gradually, breaking down the gluten for that classic tender crumb. Many Amish bakers swear by this method—it's what gives these donuts their signature pillowy quality!
Can I make these donuts without a deep fryer?
Use a heavy-bottomed pot with at least 2 inches of oil. A deep-fry thermometer is essential to maintain 350°F. Work in small batches to keep the oil temperature stable—just like the Amish method. A Dutch oven works beautifully for this!
What's the secret to the perfect glaze?
The glaze should be thick enough to coat but still drizzle smoothly—like honey. Mix 2 cups powdered sugar with 1 tbsp vanilla and ¼ cup milk, adjusting with 1 tsp milk at a time. Apply to warm (not hot) donuts so the glaze sets properly. A sprinkle of cinnamon adds that classic Amish touch!
How do I store leftover Amish donuts?
Keep them in an airtight container with parchment paper between layers. They'll stay fresh for 3 days at room temperature. For longer storage, freeze fried donuts (before glazing) for up to 3 months. Reheat in a 350°F oven for 5 minutes to restore crispiness.
Can I make these donuts without butter?
Yes! Substitute ½ cup vegetable shortening or ½ cup melted coconut oil (cooled). Butter adds flavor, but these alternatives work well for a lighter texture. The key is keeping the dough cool during mixing—this prevents overdevelopment of gluten.