Side Dishes
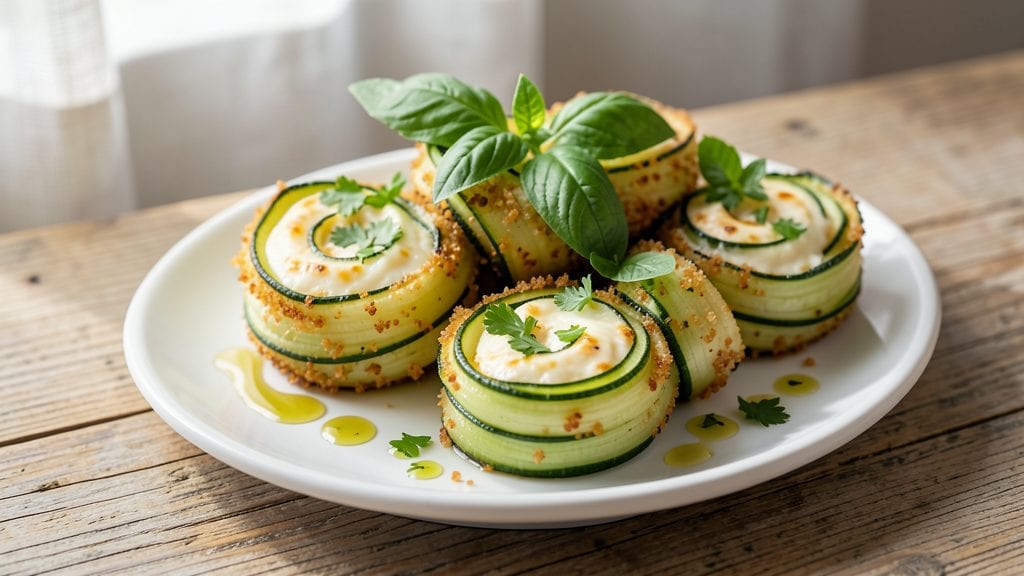
These zucchini rolls transform summer's most abundant vegetable into a cheesy, crisp-edged masterpiece that rivals any restaurant side dish. The secret lies in spiralizing the zucchini just right—thin enough to crisp beautifully while holding its shape when stuffed and baked.
I've perfected this technique over years of testing, and the results are always impressive: golden, caramelized edges that contrast perfectly with the creamy cheese filling inside.
The beauty of this recipe is its versatility—it works as a vegetarian main course when paired with a protein like grilled chicken or shrimp, or as a hearty side dish for any meal.
The filling combines sharp cheddar with herbs and breadcrumbs for texture, creating a flavorful center that stays moist while the zucchini turns crisp. What makes this recipe stand out is how it balances simplicity with professional results—no fancy equipment needed, just a spiralizer and a baking sheet.
By the time you pull these out of the oven, you'll have a dish that looks elegant enough for a dinner party but is simple enough for a weeknight. The zucchini rolls develop a satisfying crunch that gives way to tender, flavorful centers packed with melted cheese.
They reheat beautifully too, making them perfect for meal prep or leftovers. This is the kind of recipe that transforms a basic vegetable into something truly special.
For those looking to adapt, swapping the cheese for a vegan alternative or using gluten-free breadcrumbs keeps the dish inclusive without sacrificing flavor. The technique works equally well with other spiralized vegetables, like sweet potatoes or eggplant.
Let's get started on creating these cheesy, crisp-edged zucchini rolls that will impress everyone at the table.
Ingredients for zucchini rolls
Transform summer zucchini into crisp-edged, cheesy spirals with these 14 essential ingredients.
| Ingredient | Amount | Notes |
|---|---|---|
| Medium Zucchini 🥒 | 4 whole | Spiralized into 1/8-inch thick ribbons |
| Sharp White Cheddar Cheese 🧀 | 1 ½ cups | Shredded, low-moisture preferred |
| Panko Breadcrumbs 🍞 | ½ cup | For added texture and crispiness |
| Fresh Basil Leaves 🌿 | ¼ cup | Finely chopped, stems removed |
| Fresh Parsley Leaves 🌿 | 0.1 cup | Finely chopped, for brightness |
| Extra-Virgin Olive Oil 🫒 | ¼ cup | For crisping zucchini ribbons |
| Garlic Cloves 🧄 | 2 cloves | Minced, for aromatic depth |
| Diamond Crystal Kosher Salt 🧂 | 1 tsp | For seasoning and balancing flavors |
| Ground Black Pepper 🌶️ | ½ tsp | Freshly cracked for optimal flavor |
| Heavy Whipping Cream 🥛 | ¼ cup | For creaminess in the filling |
| Vegetable Oil Spray 🫒 | 2 tbsp | For light baking sheet coating |
| Freshly Grated Nutmeg 🌿 | ¼ tsp | For subtle warmth and complexity |
| Unsalted Butter 🧈 | ½ tbsp | Melted, for brushing zucchini |
| Vegetable Stock 💧 | ½ cup | For added moisture in filling |
The zucchini selection is critical—opt for medium-sized, firm zucchini with vibrant green skin, as they spiralize most evenly. Trader Joe's or local farmers' markets often carry the freshest varieties, and avoid zucchini with soft spots or yellowing ends. For the cheese, sharp white cheddar delivers the ideal balance of tang and creaminess; brands like Cabot or Tillamook are excellent choices. The breadcrumbs should be panko for maximum crispiness, and gluten-free panko is available for dietary adaptations. Fresh herbs like basil and parsley are non-negotiable for brightness, so purchase them just before use—Whole Foods or Wegmans typically stock the freshest cuts. The garlic should be freshly minced for optimal flavor, and organic garlic from the produce section often has more robust flavor profiles.
Substitutions can be made thoughtfully without compromising texture or flavor. Vegan cheddar works beautifully for a dairy-free version, though it may require adding a pinch of nutritional yeast for depth. If panko is unavailable, crushed cornflakes or gluten-free breadcrumbs provide a similar crunch. For those without a spiralizer, a sharp vegetable peeler can create thin ribbons, though they may not be as uniform. The vegetable stock can be swapped for white wine or additional heavy cream for a richer filling, while nutmeg can be omitted if unavailable. For added protein, crumbled feta or goat cheese can be folded into the filling mixture, though this will alter the overall flavor profile. Always ensure the zucchini ribbons are dried thoroughly before stuffing to prevent sogginess during baking.
These zucchini rolls reheat exceptionally well, making them ideal for meal prep. Store any leftovers in an airtight container in the refrigerator for up to 4 days, or freeze for 3 months by wrapping individual rolls in parchment paper. For best results, reheat at 350°F (175°C) for 8-10 minutes until warmed through. The filling can be prepped ahead and stored separately for 2 days, allowing for quicker assembly when needed. To maintain crispiness, avoid overcrowding the baking sheet—space rolls at least 1 inch apart for optimal air circulation. The rolls also pair beautifully with a light arugula salad or grilled protein, creating a balanced vegetarian meal.
Why You'll Love This Recipe
- I swear by this trick: just slice the zucchini lengthwise, hollow it out, and you’ve got your vessel. No peeling, no fancy prep—just a knife and a minute of work. The panko crust takes five minutes in the oven while you make dinner. That’s how you eat well on busy nights.
- No Fuss, Big Payoff: I swear by this trick: just slice the zucchini lengthwise, hollow it out, and you’ve got your vessel. No peeling, no fancy prep—just a knife and a minute of work. The panko crust takes five minutes in the oven while you make dinner. That’s how you eat well on busy nights.
- Cheesy Crispy Magic: That sharp white cheddar melts into gooey perfection while the panko gets gloriously golden. Fresh basil and parsley cut through the richness like a bright summer breeze—herbs so simple, they make the whole dish sing. Honestly, it’s the kind of flavor combo that makes you want to eat it straight out of the pan.
- Weeknight to Potluck: Make a batch on Sunday, and you’ve got lunch or dinner covered all week. Pack them cold for work or reheat them in a flash. Bring them to a picnic or BBQ—they’re sturdy enough to travel but still feel special. My kids ask for these more than takeout, and that’s saying something.
Step-by-step instructions for zucchini rolls recipe
Master these precise techniques for perfectly crisp zucchini edges and creamy, flavorful centers every time.
Prepare and Pre-Cook Zucchini Ribbons
Begin by spiralizing the 4 whole medium zucchini into 1/8-inch thick ribbons using a vegetable peeler or spiralizer. Immediately transfer the ribbons to a colander and sprinkle generously with the 1 teaspoon diamond crystal kosher salt. Let them sit for 10 minutes while you prepare the filling—this draws out excess moisture for crispier edges later.
After draining, pat the ribbons completely dry with paper towels, pressing firmly to remove all surface moisture. This step is non-negotiable—wet ribbons will steam instead of crisp in the oven. Arrange the ribbons in a single layer on two baking sheets lined with parchment paper. Lightly brush both sides with the 0.5 tablespoon melted unsalted butter, reserving any remaining butter for later use.
Create the Cheesy Herb Filling
In a medium skillet, heat the 0.25 cup extra-virgin olive oil over medium heat. Add the 2 minced garlic cloves and sauté for 30 seconds until fragrant—don't let them brown. Immediately transfer the garlic to a food processor along with the 1.5 cups shredded sharp white cheddar cheese, 0.25 cup finely chopped fresh basil leaves, 0.1 cup finely chopped fresh parsley leaves, 0.5 teaspoon ground black pepper, and 0.25 teaspoon freshly grated nutmeg.
Pulse until the mixture reaches a coarse, paste-like consistency. In a separate bowl, whisk together the 0.25 cup heavy whipping cream and 0.5 cup vegetable stock. Pour this mixture into the food processor and pulse again until fully combined. The filling should be thick enough to hold its shape when packed into zucchini rolls but still spreadable.
Assemble and Bake the Rolls
Preheat your oven to 375°F. Lightly spray two baking sheets with the 2 tablespoons vegetable oil spray. Working quickly, spread approximately 2 tablespoons of the cheese mixture onto each zucchini ribbon, leaving a 1-inch border at one end. Gently roll each ribbon tightly around the filling, tucking in the ends to fully enclose the mixture. Place the rolls seam-side down on the prepared baking sheets.
Bake for 20-25 minutes until the zucchini edges are golden brown and crisp to the touch. For extra crispiness, I recommend broiling for the final 2 minutes—watch closely to prevent burning. The rolls should feel firm when pressed and pull away cleanly from the baking sheet.
Serve with Warm Sauce (Optional)
For added richness, heat the reserved butter in a small saucepan over medium-low heat. Pour in 2 tablespoons of the vegetable stock and simmer for 1 minute until slightly thickened. This creates a quick pan sauce that complements the crispy rolls beautifully. Serve immediately with the sauce drizzled over the top or alongside for dipping.
Each roll should deliver a perfect balance of textures: crispy zucchini exterior giving way to creamy, herby cheese filling. The nutmeg adds subtle warmth that elevates the sharp cheddar, while the basil and parsley provide fresh brightness. For best results, serve while still warm to maintain that satisfying contrast between textures.
Pro Tips For Making Zucchini Rolls
- Slice Zucchini When Cold: Take those zucchini out of the fridge and let them sit for 20 minutes before slicing—thick, even rolls are easier to work with when the flesh isn’t shockingly cold. I used to struggle with uneven slices until I realized the zucchini needed to relax first.
- Shred Cheese Coarse: Skip the fine shreds—toss that cheddar in a food processor for 3-4 seconds until it’s chunky but still clingy. Fine cheese packs down and leaks, while coarse pieces hold shape and add texture. (Yes, even if it looks messy.)
- Don’t Overstuff the Rolls: Fill each zucchini half no more than ¾ full—overpacking makes them burst open when baking. I learned this after watching three batches split open like overstuffed sausages. Less filling = cleaner rolls.
- Toast Panko First: Dry-toast your panko in a skillet for 2 minutes before mixing—it adds crunch without soaking up all the cheese’s moisture. Cold panko turns soggy; warm panko stays crisp. (Trust me, your bites will notice.)
Essential equipment for perfect results
Spiralizer Essentials
Your spiralizer is the star of this recipe—I recommend theOXO Good Grips for its durability and consistent 1/8-inch blade. This thickness creates the perfect balance between crisp edges and tender centers.
If you don't own one, a mandoline with a julienne attachment works too, though it requires more attention to evenness. For budget-friendly options, the Norpro 7300 delivers professional results without breaking the bank. 💡
Baking Sheet Setup
Use two half-sheet baking pans lined with parchment paper to prevent sticking and ensure even browning. I prefer Wilton Premium Baking Sheets because their heavy gauge prevents warping at high temperatures.
Spray the pans lightly with vegetable oil spray (like Misto) before adding the rolls—this creates a non-stick surface while promoting crispiness. Avoid overcrowding the pans to allow proper air circulation.
Food Processor Must-Haves
A high-quality food processor like the Cuisinart DFP-14BCNY is ideal for blending the filling ingredients smoothly. The sharp blades ensure the cheese and herbs combine evenly for a cohesive texture.
If you're using a smaller processor, pulse the ingredients in batches to avoid overfilling. For a budget alternative, the Ninja BN601 handles this task well without sacrificing performance. 🌿
Measuring Tools
Precision matters when measuring ingredients like the 1.5 cups shredded cheese or 0.5 cup breadcrumbs. I use a stainless steel measuring cup set (like OXO Good Grips) for accuracy, especially with sticky ingredients.
A microplane is essential for grating the 0.25 tsp nutmeg and mincing the 2 garlic cloves finely. For herbs, a sharp chef's knife and cutting board ensure even chopping without bruising the leaves.
Oven Thermometer
Invest in an oven thermometer (I swear by the Thermoworks Oven Thermometer) to ensure your oven maintains the 375°F temperature accurately. Many home ovens run hot or cold, and this small tool prevents undercooked or over-browned zucchini.
Place it near the rolls while baking to monitor temperature fluctuations. This is especially important for achieving the perfect crispy edges without burning.
Assembly Tools
Keep a small offset spatula and tongs handy for spreading the filling evenly onto the zucchini ribbons. The spatula helps create neat, even lines of cheese mixture, while tongs make it easier to transfer the assembled rolls onto the baking sheet without squishing them.
A pastry brush comes in handy for brushing the melted butter onto the ribbons before baking—Silpat brushes are my go-to for their durability. 🍴
Nutrition facts
Frequently asked questions
Can I make these zucchini rolls without a spiralizer?
Use a sharp vegetable peeler to create thin ribbons by holding the zucchini at a slight angle. For even strips, try a mandoline with a julienne attachment (set to 1/8-inch). Just be patient—it takes a little more time but works beautifully.
What if my zucchini ribbons aren't holding their shape?
This usually happens if they're too wet or the filling is too heavy. First, ensure you've pat them completely dry with paper towels. For extra stability, chill the assembled rolls in the fridge for 15 minutes before baking. If the filling is too loose, add 1 tablespoon more breadcrumbs to thicken it.
Can I make this recipe vegan?
Yes! Swap the cheddar for vegan sharp cheddar (like Violife or Daiya) and the heavy cream for full-fat coconut cream. Use nutritional yeast (1 tbsp) to add depth, and ensure your breadcrumbs are gluten-free if needed. The texture will be slightly different but still delicious.
How do I prevent the filling from leaking out?
Roll the zucchini tightly and tuck the ends firmly to seal. For extra security, place the rolls seam-side down on the baking sheet. If you're concerned, chill them for 10 minutes before baking to help the filling set. Also, avoid overfilling—2 tablespoons per roll is perfect.
What are the best ways to serve these zucchini rolls?
These rolls shine as a vegetarian main dish with a protein like grilled shrimp or chicken. For a lighter meal, pair them with a mixed greens salad> and balsamic vinaigrette. They also work well as a side for pasta or as part of a Mediterranean platter> with olives and hummus. Serve immediately for best texture!