Main Courses
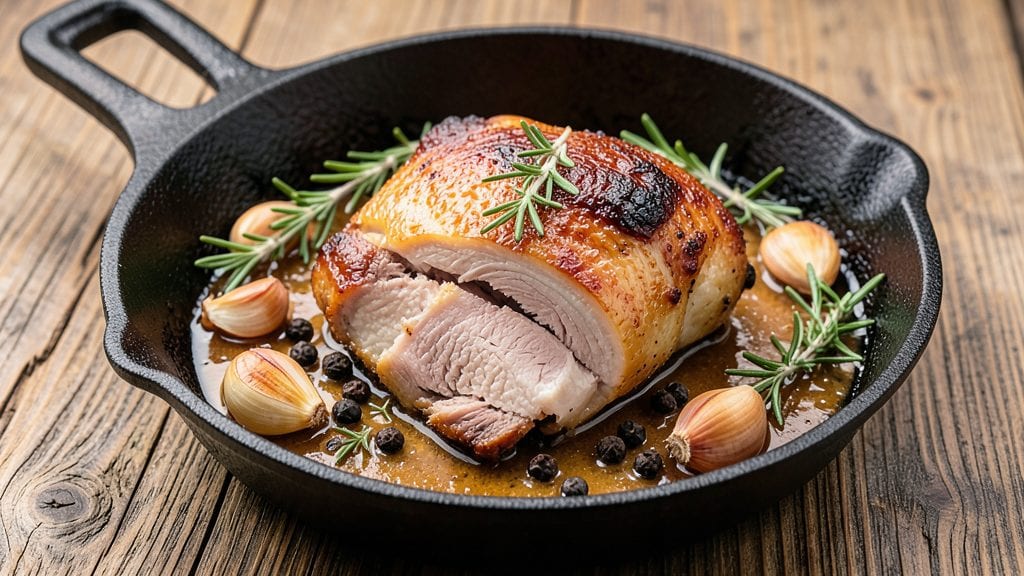
Mastering a duck neck recipe transforms simple ingredients into a dish that feels like a restaurant centerpiece—crispy skin that shatters with each bite and silky meat that practically melts on the tongue.
I perfected this technique after years of experimenting with duck confit and braising methods, and the results are worth every minute of effort. The secret lies in a slow cook that renders fat into crispy perfection while keeping the meat tender.
This one-pot method simplifies what many home cooks consider intimidating—no need for multiple pans or complicated techniques. Start with a high-heat sear to develop flavor, then slow-cook until the meat falls apart effortlessly.
The rendered fat becomes the star, creating a golden crust that’s impossible to resist. It’s the kind of dish that turns a weeknight into a special occasion without requiring hours of prep.
By the time you’re done, you’ll have a platter of crispy-edged, silky duck necks swimming in their rich, flavorful fat—ready to be served with roasted vegetables or crusty bread to soak up every last drop.
The aroma alone will have everyone gathered around the table, and the first bite will silence any doubts about whether homemade duck can compete with restaurant versions. This is comfort food elevated to fine dining.
Pair it with a bold red wine or a crisp apple cider to complement the richness, and you’ve got a complete dining experience. The beauty of this recipe is its versatility—serve it as a main course for a dinner party or a hearty weeknight meal.
Here’s how to make it happen in your kitchen.
Ingredients for duck neck
Simple ingredients elevate duck necks to restaurant-quality crispy-silky perfection in one pot.
| Ingredient | Amount | Notes |
|---|---|---|
| Duck Neck 🦆 | 2 lb | Fresh, skin-on preferred for crispiness |
| Kosher Salt 🧂 | 1 ½ tbsp | Coarse grain for seasoning |
| Fresh Black Peppercorns 🌶️ | 1 tsp | Cracked for texture |
| Garlic Cloves 🧄 | 6 cloves | Smashed for infusion |
| Fresh Thyme Leaves 🌿 | ½ cup | Stems removed, loosely packed |
| Fresh Rosemary Sprigs 🌿 | 4 whole | Needles stripped from stems |
| Extra-Virgin Olive Oil 🫒 | ¼ cup | High-quality for searing |
| Dry Red Wine 🍷 | 1 cup | Bold variety like Cabernet Sauvignon |
| Chicken Stock 🍲 | 1 cup | Homemade preferred, low-sodium |
| Honey 🍯 | 1 tbsp | Light variety for balance |
| Fresh Bay Leaves 🍃 | 2 whole | For subtle aromatic depth |
| Fresh Parsley Leaves 🌿 | ¼ cup | Chopped for garnish |
| All-Purpose Flour 🌾 | 1 tbsp | For dredging crispiness |
The duck necks are the star—look for fresh, skin-on cuts at specialty butchers or high-end grocery stores like Whole Foods or Eataly. Skin should be thick and unbroken for maximum crispiness. If using frozen, thaw overnight in the fridge. The extra-virgin olive oil matters too—opt for a fruity, peppery variety like Colavita or Bertolli for searing. Fresh herbs are non-negotiable here; dried won't deliver the same aromatic punch. For the wine, bold reds like Cabernet Sauvignon work best—their tannins complement the duck's richness.
No red wine? Dry white wine or extra chicken stock will work, though the flavor profile shifts slightly. Short on thyme? Fresh oregano or marjoram at the same quantity. The honey balances acidity—substitute maple syrup if needed. For the bay leaves, dried leaves work at half the amount, but fresh is ideal. The flour dredge is critical for crispiness—use all-purpose, not cake flour. If you're prepping ahead, trim excess fat from the duck necks before storing to prevent rancidity.
Rendered duck fat keeps for up to 6 months in the freezer—store in an airtight container. The cooked duck necks reheat beautifully; warm in a 300°F oven for 15 minutes to restore crispiness. Portion into meal prep containers with a drizzle of the rendered fat for easy lunches. The herbs can be prepped a day ahead, but add fresh parsley just before serving for maximum brightness. This dish tastes even better the next day as flavors meld.
Why You'll Love This Recipe
- One-Pan Magic: I swear by this recipe when I’m too tired to scrub pots—just toss the duck necks, salt, and peppercorns on a sheet pan, add crushed garlic and thyme, and let the oven do the work. The crispy skin forms right there, no flipping or fussing.
- Umami Bomb: That duck neck? It’s like a flavor grenade—rich, deep, and slightly fatty in the best way. The thyme and garlic soak into the meat, turning every bite into a savory hug, especially when the skin gets that perfect crackle.
- Leftovers for Days: Between us, I make this on Sundays because the leftovers reheat like a dream—crispy edges stay crispy, and the meat stays juicy. Perfect for tossing into salads, grain bowls, or even a quick sandwich when I’m too lazy to cook.
- Budget Luxury: Honestly, duck necks are the best-kept secret for a fancy-feeling meal without breaking the bank. They’re cheaper than breast but pack way more flavor, and I always feel like I’m serving something special—even when it’s just me and a glass of wine.
Step-by-step instructions for crispy duck neck with silky meat
Master this technique to achieve restaurant-quality duck neck with irresistible crispy skin and tender, flavorful meat.
Prepare the Duck Neck for Maximum Crispiness
Pat the 2 lb duck neck completely dry with paper towels—this is absolutely critical for crispy skin. I press firmly all over, especially around the skin folds, to remove any moisture that would prevent browning. Place the duck neck skin-side up in a deep skillet and refrigerate uncovered for 30 minutes. This chilling step helps render fat more effectively during cooking.
While the duck chills, combine the 1.5 tbsp kosher salt and 1 tsp cracked fresh black peppercorns in a small bowl. Generously season both sides of the duck neck with this mixture, pressing the salt crystals into the skin. The salt will draw out moisture and create that perfect crispy bark. Let the seasoned duck rest at room temperature for 15 minutes before cooking.
Render Fat and Develop Crispy Skin
Place the chilled duck neck skin-side down in a cold, heavy-bottomed Dutch oven. Add the 0.25 cup extra-virgin olive oil to the skillet. Turn the heat to medium-low and allow the duck to come to temperature gradually—this prevents shocking the meat. Cook undisturbed for 15 minutes until the skin turns deep golden brown and begins to crisp.
Here's where the magic happens: carefully flip the duck neck and continue cooking for another 10 minutes. You'll see the fat begin to render out and pool in the pan. This rendered fat is what creates that irresistible crispy texture and rich flavor. If the fat starts to smoke excessively, reduce the heat slightly to maintain gentle cooking.
Build Flavor with Aromatics and Wine
Remove the duck neck from the pan and set it aside. In the same Dutch oven, add the 6 smashed garlic cloves, 0.5 cup fresh thyme leaves, and 4 rosemary sprigs (needles stripped from stems). Cook over medium heat for 1 minute until fragrant—this releases their essential oils into the fat.
Pour in the 1 cup dry red wine and scrape up all the browned bits from the bottom of the pan with a wooden spoon. This deglazing step captures all the concentrated duck flavor. Let the wine simmer for 3-4 minutes until reduced by half. The aroma should be rich and complex at this point, with notes of caramelized garlic and herbs.
Simmer for Tender Perfection
Return the duck neck to the Dutch oven, skin-side up. Add the 1 cup chicken stock, 1 tbsp honey, and 2 whole fresh bay leaves. Bring to a gentle simmer, then reduce heat to maintain a barely perceptible bubble. Cover and cook for 1 hour 30 minutes, turning the duck neck occasionally to ensure even cooking.
After 1 hour 30 minutes, check for doneness by inserting a meat thermometer into the thickest part of the meat—it should read 175°F. The meat should be fork-tender with just a slight resistance. If the liquid has reduced significantly, add a splash of water or stock to prevent drying out. The duck neck should be submerged halfway in the flavorful liquid.
Finish with Crispy Skin and Garnish
Remove the duck neck from the liquid and place it on a cutting board. Let it rest for 10 minutes before slicing. While it rests, strain the cooking liquid into a clean saucepan and simmer for 5-7 minutes to reduce slightly. If needed, whisk in 1 tbsp all-purpose flour to thicken the sauce to your desired consistency.
Slice the duck neck against the grain into ½-inch thick pieces. Arrange on a serving platter and spoon the reduced sauce over the top. Garnish with 0.25 cup chopped fresh parsley leaves for a pop of color and freshness. The result should be perfectly crispy skin that gives way to silky, flavorful meat with every bite.
Pro Tips For Making Duck Neck
- CRACK THE SKIN FIRST: Duck necks come with stubborn skin that won’t render fat properly. Use kitchen shears to snip a few slits along the thickest parts before cooking—this lets the fat escape smoothly and prevents greasy messes.
- SALT THE DUCK NECKS THE NIGHT BEFORE: I learned this the hard way—salting duck necks right before cooking leaves them too wet. Toss them with 1-2 teaspoons of kosher salt per pound and refrigerate uncovered for 12-24 hours. The skin crisps better, and the meat stays juicy.
- DON’T CROWD THE PAN: Stuffing too many duck necks into a pot guarantees steamed, soggy skin instead of crispy edges. Cook in batches if needed—leave at least ½ inch of space between pieces. They’ll brown properly and release fat without turning into a greasy swamp.
- SMASH THE GARLIC CLOVES: Whole garlic cloves won’t infuse the duck necks like you want. Crush them with the flat side of your knife or a mortar and pestle before adding them to the pot. This releases more flavor into the fat and sauce—trust me, it makes a real difference.
Creative variations of this dish
French Confit Style
For a classic French-inspired take, slow-cook the duck necks in their own rendered fat until fall-apart tender—this is the essence of traditional duck confit.
After searing, submerge the duck necks in a Dutch oven with 3 cups duck fat (or substitute with olive oil if needed) and 2 sprigs thyme, then poach at 300°F for 2-3 hours until fork-tender.
The result is ultra-tender meat with skin that crisps beautifully when seared briefly at the end. Serve with a simple sautéed green bean salad and crusty bread to soak up the fat. 🌟
Asian-Inspired Five-Spice
Transform this dish with a fragrant Asian twist by adding 1 tbsp Chinese five-spice powder and 1 tbsp grated ginger during the simmering phase. Replace the red wine with 1 cup soy sauce and 1 cup chicken stock, and finish with a drizzle of honey-glazed hoisin sauce.
The five-spice blend adds warmth and depth, while the ginger brightens the rich duck flavor. Garnish with sliced scallions and sesame seeds for a striking presentation. 🌶️
Smoky BBQ Glaze
Give your duck necks a Southern flair by finishing them with a smoky BBQ glaze. After simmering, strain the cooking liquid and mix in ½ cup BBQ sauce (like Sweet Baby Ray's Original or a homemade blend) and 1 tbsp smoked paprika.
Return the duck necks to the sauce and simmer uncovered for 10 minutes to thicken. The result is a sticky, smoky glaze that clings to the crispy skin. Serve with cornbread muffins and a side of collard greens for a full Southern feast. 🔥
Herb-Crusted Crispy
For an extra-crispy texture, coat the duck necks in a mix of 1 tbsp Dijon mustard, 1 tbsp chopped fresh herbs (parsley, tarragon, or chives), and 1 tbsp breadcrumbs before the final sear. This herb crust adds an aromatic layer that contrasts with the rich duck fat.
After simmering, pat the duck necks dry, coat them in the herb mixture, and sear in a hot skillet until golden and crispy. The crust adds texture and freshness to every bite. ✨
Spicy Orange-Ginger
Brighten the dish with a zesty kick by adding 1 tbsp grated orange zest, 2 tbsp orange juice, and 1 tsp red pepper flakes to the simmering liquid. The citrus cuts through the richness of the duck while the ginger and chili add warmth.
Finish with a sprinkle of toasted sesame seeds and sliced orange segments for a refreshing contrast. This variation is perfect for spring or summer dinners. 🍊
Make-Ahead Confit
For a hands-off approach, make this dish ahead of time and reheat for a stress-free meal. After simmering, let the duck necks cool in the fat, then store them in an airtight container in the fridge for up to 3 days.
To reheat, place the duck necks in a skillet with their fat and warm over medium-low heat for 10 minutes, then crisp the skin in a hot pan for 2-3 minutes per side. The flavors deepen overnight, making it even more delicious the next day.
Ideal for meal prep! ⏰
Nutrition facts
Frequently asked questions
Why does the recipe call for chilling the duck neck before cooking?
Chilling the duck neck for 30 minutes helps render the fat more evenly and creates a better crispy skin. The cold temperature firms up the fat, allowing it to pool and crisp properly when heated. Skipping this step can lead to greasy skin instead of the desired crunch.
Can I substitute chicken stock with another liquid?
Yes! Use 1 cup vegetable stock or even 1 cup water plus 1 tbsp soy sauce for a similar effect. The key is maintaining enough liquid to keep the duck moist during cooking. Avoid salty broths like bouillon cubes, as they can overpower the dish.
What's the best way to reheat leftover duck neck?
Place the duck necks in a skillet with their rendered fat over medium-low heat for 10 minutes, then increase heat to crisp the skin for 2-3 minutes per side. Never microwave—it ruins the texture! The fat helps restore crispiness while keeping the meat tender.
Is it okay if the duck necks aren't fully submerged in liquid?
No, they should be submerged halfway to prevent drying out. If the liquid reduces too quickly, add a splash of water or stock. The goal is tender meat with crispy skin—partial submersion can lead to tough edges.
Can I make this recipe in a slow cooker?
Yes! Sear the duck necks first in a skillet, then transfer to the slow cooker with all ingredients. Cook on Low for 4-5 hours or High for 2-3 hours, adding extra liquid if needed. The slow cooker method is perfect for hands-off prep, though the skin may be less crispy than oven methods.