Desserts
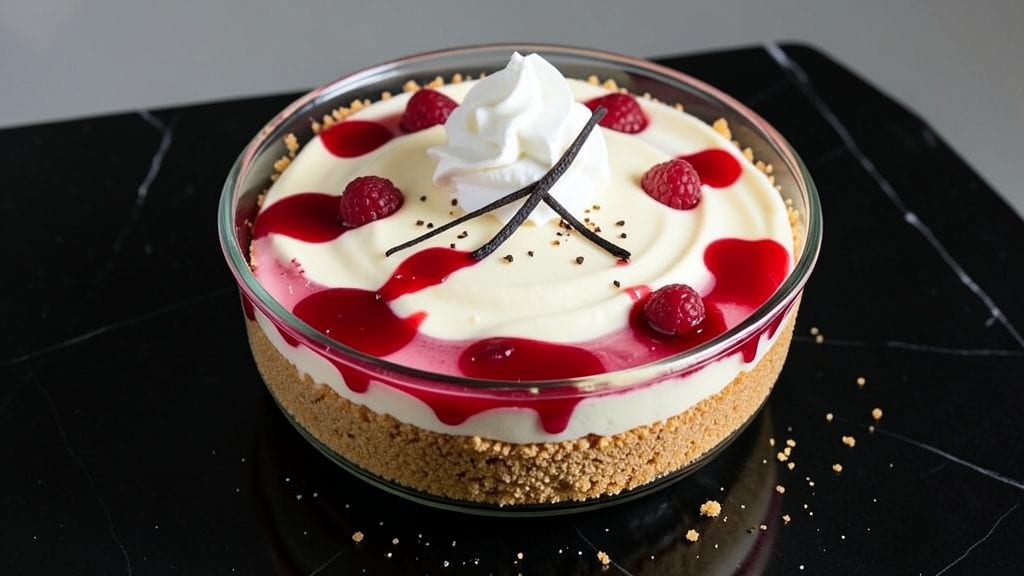
A no-bake cheesecake that combines wobbly jello layers, creamy pudding, and rich cheesecake filling delivers dessert perfection without turning on the oven. This recipe transforms simple pantry staples into a restaurant-worthy treat that stays cool, creamy, and crack-free.
The secret lies in precise layering and chilling times—no baking skills required, just patience and assembly.
The beauty of this dessert is its versatility: you can customize flavors by swapping jello colors (berry, lemon, or lime) and adjust sweetness to taste. Each layer serves a purpose—jello provides structure, pudding adds creaminess, and the cheesecake filling ties everything together with its velvety texture.
With just 15 minutes of prep and 4 hours of chilling, you’ll have a dessert that looks impressive yet requires no special equipment.
What makes this recipe stand out is the foolproof method for avoiding soggy layers, ensuring every slice has that signature wobble and clean break. The cheesecake filling stays firm yet tender, while the jello and pudding create a harmonious balance of textures.
Whether serving for a holiday gathering or a casual dessert night, this cheesecake delivers professional results with minimal effort.
Top with whipped cream, fresh berries, or a sprinkle of crushed cookies for added flair. The best part? No oven, no stress, and no cracks—just pure, creamy indulgence. Let’s get started on this effortless dessert masterpiece.
Ingredients for jello pudding no bake cheesecake
Pantry staples and precise layering transform simple ingredients into restaurant-quality no-bake cheesecake perfection.
| Ingredient | Amount | Notes |
|---|---|---|
| Unflavored Gelatin 🍬 | 1 package | Knockbox or similar brand preferred |
| Granulated Sugar 🍚 | 1 ½ cups | White or light brown preferred |
| Heavy Cream 🥛 | 2 cups | Full-fat for optimal texture |
| Large Eggs 🥚 | 4 whole | Room temperature for best blending |
| Sour Cream 🍦 | 1 cup | Full-fat for creaminess |
| Vanilla Extract 🌿 | 2 tsp | Pure Madagascar preferred |
| Instant Vanilla Pudding Mix 🍮 | 1 box | Vanilla flavor, 3.4 oz size |
| Milk 🥛 | 1 ½ cups | Whole milk preferred |
| Cream Cheese 🧀 | 16 oz | Full-fat block, room temperature |
| Sweetened Condensed Milk 🥛 | 1 can | 14 oz can, not evaporated |
| Lemon Juice 🍋 | 1 tbsp | Freshly squeezed for brightness |
| Graham Cracker Crumbs 🍪 | 2 cups | Fine texture preferred |
| Melted Butter 🧈 | ½ cup | Unsalted, cooled slightly |
| Whipped Cream 🍦 | 1 cup | Stabilized for piping |
| Fresh Berries 🍓 | 1 ½ cups | Optional garnish |
The gelatin forms the structural backbone of this dessert, so Knockbox or high-quality unflavored gelatin is essential for clean layers. Walmart or Target typically carry Knockbox, while specialty stores like Williams Sonoma offer premium options. Avoid pre-flavored gelatin—it alters the delicate balance of this recipe. For the graham cracker crust, Honey Maid or Keebler graham crackers yield the finest crumbs. Crush them in a food processor for optimal texture, but a ziplock bag and rolling pin works too. The cream cheese should be full-fat and at room temperature—cold cream cheese creates lumps in the filling. Purchase block cream cheese rather than tubs for superior texture.
No Knockbox? Substitute with 1.5 teaspoons powdered gelatin (like Knox) mixed with 2 tablespoons cold water, then heated until dissolved. For a dairy-free option, replace the heavy cream and sour cream with full-fat coconut cream, though the texture will be slightly denser. Short on vanilla extract? Vanilla bean paste works beautifully—use 1.5 teaspoons. The condensed milk can be swapped for equal parts sweetened condensed coconut milk, though the flavor profile shifts slightly. If you prefer a tangier dessert, add 0.5 teaspoon of lemon zest to the cheesecake filling. For those avoiding refined sugar, reduce the granulated sugar by 0.5 cup and add 0.5 cup of monk fruit sweetener, though taste may vary.
This dessert requires 4 hours of uninterrupted chilling for optimal texture—set a timer to avoid over-chilling. Store leftovers covered in the refrigerator for up to 5 days, though the layers may separate slightly after day 3. For longer storage, freeze individual slices wrapped in plastic for up to 2 months. Allow frozen cheesecake to thaw in the refrigerator overnight before serving. The graham cracker crust can be prepared 1 day ahead and stored in an airtight container. The cheesecake filling and pudding layers should be assembled within 2 hours of serving to maintain their perfect consistency. When transporting, place a tray under the springform pan to catch any potential drips during chilling.
Why You'll Love This Recipe
- No Oven Needed: I’ll admit, I was skeptical about no-bake desserts—until I tried this. Just boil water, dissolve gelatin, and mix. No waiting for an oven, no greasy pans. The whole process? Under 20 minutes, start to finish.
- Silky Smooth Texture: That gelatin-heavy cream combo? It’s next-level. The filling is like a cross between pudding and cheesecake—creamy, cool, and just firm enough to slice. Honestly, it’s the kind of dessert that makes you forget it’s basically just sugar, eggs, and gelatin.
- Party-Ready in Minutes: Between us, this is my go-to for last-minute gatherings. The sour cream adds that tangy depth, and you can top it with berries or whipped cream. Serve it chilled, and it’s instant crowd-pleaser—no one will guess it’s no-bake.
- Budget-Friendly Luxury: I make this for holidays, potlucks, or just because. Eggs and gelatin are cheap, and a single batch feeds six. Leftovers? They keep well for days, and it’s way cheaper than store-bought cheesecake. Plus, it’s one of those desserts that tastes fancy without breaking the bank.
Step-by-step instructions for jello pudding no-bake cheesecake
This layered dessert combines creamy textures and vibrant flavors without requiring a single minute in the oven.
Prepare the Graham Cracker Crust
In a medium bowl, combine the 2 cups graham cracker crumbs with the 0.5 cup melted butter. Use a fork to mix until the crumbs are evenly moistened and the mixture resembles damp sand. Press this mixture firmly into the bottom of a 9-inch springform pan, creating an even layer. Use the back of a spoon to compact it evenly, ensuring there are no gaps. Chill in the refrigerator while you prepare the filling layers.
This foundational layer must be fully set before adding the pudding mixture. If you press too lightly, the crust will crumble when you cut slices. A properly compacted crust prevents sogginess and provides the perfect textural contrast to the creamy filling.
Create the Jello Pudding Layer
In a heatproof bowl, sprinkle the 1 package unflavored gelatin evenly over the 1.5 cups milk. Let it bloom for 5 minutes—you'll see the gelatin absorb the liquid and form a gel-like consistency. In a separate saucepan, gently heat the 1.5 cups granulated sugar with 1 cup sweetened condensed milk over medium-low heat until the sugar dissolves completely. Remove from heat and whisk in the bloomed gelatin mixture until fully dissolved and smooth.
Pour this mixture into the chilled springform pan and spread it evenly over the crust. Return the pan to the refrigerator and let it set for at least 2 hours or until firm to the touch. This layer forms the wobbly, dessert-like base that distinguishes this cheesecake from traditional baked versions.
Prepare the Cream Cheese Filling
In a large mixing bowl, beat the 16 oz cream cheese with the 2 cups heavy cream and 1 cup sour cream using an electric mixer until completely smooth and creamy. In a separate bowl, whisk together the 4 whole large eggs, 1 box instant vanilla pudding mix, 2 tsp vanilla extract, and 1 tbsp lemon juice. Gradually add the dry mixture to the cream cheese mixture while mixing on low speed to prevent curdling.
Pour this filling over the set jello pudding layer in the springform pan. Tap the pan gently on the counter to release any air bubbles that may have formed. Return to the refrigerator and chill for at least 4 hours or overnight. This extended chilling time ensures the filling sets completely without developing a grainy texture.
Assemble and Garnish
Once the filling is fully set, carefully remove the springform pan from the refrigerator. Pipe the 1 cup whipped cream decoratively over the top of the cheesecake using a star tip. Arrange the 1.5 cups fresh berries on top for color and freshness. Serve immediately or return to the refrigerator until ready to serve.
The whipped cream adds a light, airy contrast to the dense filling, while the berries provide a tart counterpoint to the sweetness. This no-bake cheesecake maintains its structure perfectly when sliced, with clean layers that reveal the vibrant jello pudding beneath the creamy filling.
Pro Tips For Making Jello Pudding No Bake Cheesecake
- Bloom the gelatin right: I learned this the hard way—don’t just sprinkle gelatin into cold liquid and stir. Whisk it into warm (not boiling) water first, then let it sit for at least 5 minutes while you prep the rest. Cold water = lumpy pudding. That’s not a risk you want when your whole dessert hinges on smooth texture.
- Chill the eggs first: Crack those eggs into an ice bath bowl before whisking. Room-temperature eggs make the filling too soft, and this cheesecake will weep if it’s not set properly. Five minutes in the fridge makes a real difference—your future self will notice the cleaner slices and firmer structure.
- Whip the cream stiff: I used to stop when the cream looked "fluffy." Nope. Beat it until it holds sharp peaks that don’t flatten when you lift the beaters. Soft peaks = soggy layers. This isn’t whipped cream for coffee—it’s the backbone of your texture, so don’t skimp on the effort.
- Layer the sour cream slow: Fold in the sour cream last, and do it in three additions while mixing on low. Dumping it all at once deflates the air you worked so hard to incorporate, and that’s how you end up with dense, compact slices instead of light, jiggly layers. Patience here pays off.
Serving suggestions for this dish
Classic Presentation
Serve this cheesecake straight from the springform pan using a serrated knife dipped in hot water between slices. The knife should be warmed to 160°F for clean cuts that reveal the wobbly jello layer beneath.
I like to chill the cheesecake for an extra 30 minutes before slicing to ensure perfect presentation. 💫
Whipped Cream Toppings
Add a dollop of homemade whipped cream to each slice—whisk 1 cup heavy cream with 1 tbsp powdered sugar until soft peaks form. For extra flair, pipe the cream through a Wilton 1M tip into decorative swirls. A sprinkle of toasted coconut flakes or crushed graham crackers adds texture contrast.
Fresh Fruit Garnishes
Top with sliced strawberries, raspberries, or blueberries arranged in concentric circles for visual appeal. For a tropical twist, use mandarin orange segments or mango slices>. I recommend adding fruit just before serving to prevent the jello layer from absorbing moisture.
A drizzle of chocolate ganache (melt ½ cup dark chocolate with ¼ cup heavy cream) elevates the presentation.
Caramel Drizzle
Heat ½ cup granulated sugar with 2 tbsp heavy cream in a saucepan until golden brown (about 5 minutes on medium heat). Drizzle the warm caramel over each slice in a zigzag pattern.
For a nutty variation, fold 2 tbsp chopped pecans into the caramel before drizzling. The heat of the caramel helps set the whipped cream topping beautifully. 🍯
Mini Cheesecake Portions
For parties, portion the cheesecake into ramekins or mini springform pans (about 4 oz each). Use the same layering technique but reduce each component by ⅓. These individual servings are perfect for buffet-style gatherings.
Garnish with a single berry on top and serve with a small spoon for easy scooping. The smaller portions also prevent the jello layer from over-setting during transport.
Seasonal Variations
In summer, swap the graham cracker crust for a shortbread cookie crust and top with peach slices and a drizzle of peach jam. For fall, use pumpkin spice pudding mix and garnish with cinnamon-dusted whipped cream and cranberry sauce.
In winter, add a layer of chocolate pudding** between the jello and cheesecake filling for a festive twist.
Nutrition facts
Frequently asked questions
Why does this recipe use both jello and pudding?
The jello layer creates that signature wobble and vibrant color, while the pudding adds creamy texture without making the dessert too heavy. Together, they prevent the cheesecake filling from becoming soggy by acting as moisture barriers. This combo is the secret to that perfect restaurant-style texture!
Can I make this cheesecake ahead of time?
Yes! Assemble the entire dessert (including toppings) up to 24 hours ahead and store it covered in the fridge. For best texture, let it sit at room temperature for 20-30 minutes before serving to soften slightly. The layers will still hold their structure beautifully.
What's the best way to avoid a soggy crust?
Press the graham cracker crust firmly into the pan and chill it for at least 30 minutes before adding the jello layer. Also, make sure your jello mixture is completely set (about 2 hours) before adding the cheesecake filling. This prevents moisture from seeping into the crust.
Can I substitute the graham cracker crust?
Try a crushed Oreo crust (for chocolate lovers) or a gingersnap crust (for spice). For a nutty option, use crushed pecans or almonds mixed with melted butter. Just ensure your alternative is pressed firmly and chilled before adding the jello layer.
Why does my cheesecake filling look grainy?
Graininess usually happens when the eggs are added too quickly or the mixture isn't blended smoothly. Always mix the dry ingredients with the eggs first, then gradually add to the cream cheese mixture on low speed. Also, ensure your cream cheese is at room temperature before blending.