
Side Dishes
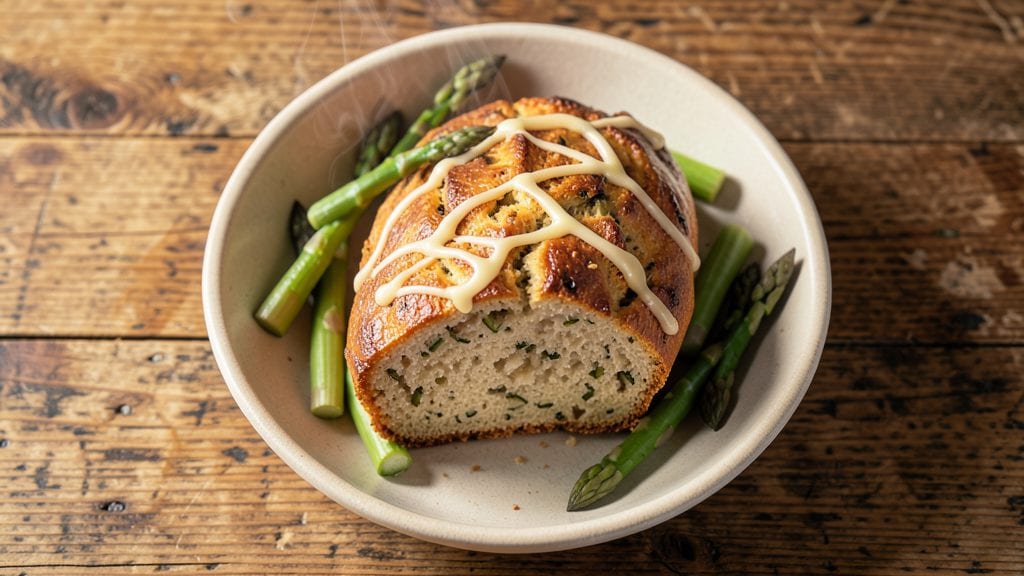
This asparagus bread recipe transforms simple dough into a herb-infused loaf packed with tender green asparagus spears and crispy edges—perfect for spring and summer gatherings. The key lies in balancing fresh asparagus with a savory dough, creating a texture that’s both hearty and delicate.
I’ve tested this recipe countless times, and the secret to success is using partially cooked asparagus to maintain that satisfying crunch while ensuring even baking.
What sets this bread apart is the way asparagus becomes part of the dough itself, infusing every bite with a subtle, earthy flavor that pairs beautifully with herbs like dill and chives.
The recipe is designed to be foolproof for home bakers, with clear steps for kneading, shaping, and baking to achieve a golden crust and a soft, airy interior. Unlike traditional bread, this version incorporates the asparagus early in the process, ensuring it cooks evenly and retains its vibrant color.
By the time it emerges from the oven, you’ll have a loaf that’s as visually striking as it is delicious—golden brown on the outside, with pockets of tender asparagus spears peeking through.
The aroma alone will draw everyone to the table, and the first slice reveals a perfect balance of textures: crispy crust, soft bread, and the satisfying bite of asparagus. This bread is ideal for sandwiches, charcuterie boards, or simply enjoying with butter and a sprinkle of flaky salt.
The best part? It’s a versatile recipe that works as a side dish or a main attraction, especially when paired with grilled meats or fresh salads. Let’s get started—your kitchen will smell like spring in no time.
Ingredients for asparagus bread
Eight simple ingredients blend into a springtime loaf bursting with asparagus and herbs—crispy outside, tender inside.
| Ingredient | Amount | Notes |
|---|---|---|
| All-Purpose Flour 🌾 | 4 cups | Sifted for lighter texture |
| Active Dry Yeast 🍞 | 2 ¼ tsp | One packet, room temperature |
| Granulated Sugar 🍚 | 1 tbsp | Feeds the yeast activation |
| Warm Water 💧 | 1 ¼ cups | 110°F for ideal yeast activation |
| Unsalted Butter 🧈 | ½ cup | Cold, cubed for easier mixing |
| Large Eggs 🥚 | 1 whole | Room temperature for even dough |
| Fresh Asparagus 🌱 | 1 lb | Tender spears, trimmed and blanched |
| Fresh Dill 🌿 | ¼ cup | Chopped, stems removed |
| Fresh Chives 🌱 | ¼ cup | Finely chopped for bright flavor |
| Garlic Cloves 🧄 | 3 cloves | Minced for savory depth |
| Kosher Salt 🧂 | 1 ½ tsp | Adjust to taste |
| Black Pepper 🌶️ | ½ tsp | Freshly ground for warmth |
| Extra-Virgin Olive Oil 🫒 | ¼ cup | For dough and brushing crust |
The asparagus is the star, so pick fresh, vibrant spears with tight tips. Whole Foods or local markets usually have the best selection—avoid those wilted ones at the back of the grocery store. Trim the tough ends, then blanch them for 2 minutes in boiling water before chopping. This keeps them bright green and slightly crispy. For the herbs, fresh dill and chives make all the difference—dried just won’t cut it here. If you’re short on time, Trader Joe’s sells pre-chopped fresh herbs in those little containers, which saves a ton of prep work. The yeast? Always check the expiration date—no one likes a flat loaf.
No fresh dill? Substitute with parsley or basil at the same amount, though the flavor won’t be identical. Ran out of chives? Green onion tops work in a pinch. The asparagus can be swapped for green beans or zucchini, but they’ll cook faster, so adjust the blanching time. For a richer dough, add 1 tbsp sour cream to the mix. The butter should be cold—don’t let it melt, or your dough will turn out greasy. If you’re baking in a dry climate, brush the crust with extra olive oil halfway through baking for that golden color.
This dough is best made fresh, but you can prep it up to 12 hours ahead and let it rise in the fridge—just let it sit at room temp for 30 minutes before shaping. The baked loaf keeps well for 3 days wrapped in a clean towel, but it’s best enjoyed fresh. For extra crunch, toast slices and serve with butter. Freezes beautifully too—slice before freezing so you can grab just what you need. The herbs lose some flavor over time, so if you’re making ahead, add fresh chives and dill right before serving.
Why You'll Love This Recipe
- No Yeast Fuss: I swear by this dough—just toss in the yeast, warm water, and a pinch of sugar, then let it sit while you chop asparagus. No kneading, no waiting hours, just a quick rise and you’re golden.
- Buttery Asparagus Magic: That melted butter mixed into the dough? It’s what turns this into something special. The asparagus adds a fresh, slightly earthy bite, while the butter keeps every slice rich and tender—like a hug in bread form.
- Weeknight to Brunch: Make a batch on Sunday, and you’ve got breakfast, lunch, or a fancy side covered. Toast it for a quick snack, serve it with soup, or even stuff it with cheese for a lazy brunch. It’s my go-to for when I’m too tired to think.
- Budget-Friendly Staples: Flour, yeast, butter—these are things I already have. No specialty ingredients, no last-minute grocery runs. And the leftovers? They last days, so I’m not scrambling to bake again next week. Smart, simple, and satisfying.
Step-by-step instructions for herb-infused asparagus bread
Transform simple dough into a stunning loaf with vibrant asparagus spears and aromatic herbs—this method guarantees a perfect rise and crunchy green surprises in every slice.
Activate the Yeast and Prepare the Asparagus
In a small bowl, whisk together the 1.25 cups warm water and 1 tbsp granulated sugar until the sugar dissolves completely. Sprinkle the 2.25 tsp active dry yeast over the top and let it sit for 5-7 minutes until it becomes foamy and bubbly. This is your signal that the yeast is alive and ready to work its magic.
While the yeast activates, trim the tough ends from the 1 lb fresh asparagus and cut the spears into ½-inch pieces. Blanch them in boiling water for 2 minutes, then immediately plunge into ice water to stop the cooking. Drain well and pat dry with paper towels—this preserves their vibrant green color and prevents a soggy dough. Set aside for now; we'll add them later when the dough is ready.
Mix the Dough and Incorporate the Herbs
In the bowl of a stand mixer fitted with the dough hook attachment, combine the 4 cups all-purpose flour, 1.5 tsp kosher salt, and 0.5 tsp black pepper. Mix on low speed to distribute the dry ingredients evenly. Add the 0.5 cup unsalted butter, cut into small cubes, and mix until the butter is fully incorporated and the mixture resembles coarse crumbs.
In a separate bowl, whisk together the 1 whole large egg, the yeast mixture (with its foamy yeast), and the 0.25 cup extra-virgin olive oil. Gradually pour this wet mixture into the dry ingredients while mixing on low speed. Once combined, increase the speed to medium and knead for 5-7 minutes until the dough is smooth, elastic, and pulls away from the sides of the bowl. The dough should be slightly tacky but not sticky—if it's too sticky, add 1 tablespoon of flour at a time until it reaches the right consistency.
Remove the dough from the mixer and turn it onto a lightly floured surface. Gently fold in the 0.25 cup chopped fresh dill, 0.25 cup chopped fresh chives, and 3 minced garlic cloves using your hands. Be careful not to overwork the dough at this stage—just enough to distribute the herbs evenly. Shape the dough into a rough ball and place it back in the mixer bowl.
First Rise and Prepare the Dough for Shaping
Cover the bowl with a clean kitchen towel and let the dough rise in a warm place for 1-1.5 hours, or until it has doubled in size. A good test is to gently press two fingers into the dough—if the indentation remains, it's ready. This rising time is crucial for developing the bread's texture, so don't rush it.
While the dough rises, preheat your oven to 375°F. Line a loaf pan with parchment paper, leaving an overhang on the sides for easy removal later. Once the dough has risen, punch it down gently to release the air. Turn it onto a lightly floured surface and divide it into two equal pieces. Roll each piece into a 12-inch log, then gently weave the logs together to create a braided effect. This is where the fun happens—take your time to create an even, tight braid.
Add the Asparagus and Shape the Loaf
Place the braided dough seam-side down in the prepared loaf pan. Arrange the blanched asparagus pieces evenly over the top of the dough, pressing them gently into the surface so they'll be visible in the finished loaf. This is the moment where your bread transforms from ordinary to extraordinary—those bright green spears will peek through the crust, adding a pop of color and a delightful surprise with every bite.
Cover the loaf pan with a towel and let the dough rise again for 30-45 minutes, or until it has risen about halfway up the sides of the pan. The asparagus should be mostly submerged in the dough, but a few pieces should still be visible on top. Brush the top of the dough with a little extra-virgin olive oil to encourage browning and add a subtle sheen.
Bake to Golden Perfection
Bake the loaf in the preheated oven for 30-35 minutes, until the top is golden brown and the internal temperature reaches 190°F when measured with an instant-read thermometer. If the top browns too quickly, tent the loaf with aluminum foil to prevent over-browning while it continues to bake.
Remove the loaf from the oven and let it cool in the pan for 10 minutes. Then, carefully transfer it to a wire rack to cool completely. The bread will continue to firm up as it cools, making it easier to slice. Once fully cooled, slice into ½-inch thick pieces and serve warm. The crust should be crisp, the interior tender, and those asparagus spears should be perfectly tender with a satisfying crunch. Enjoy your herb-infused masterpiece with butter or your favorite spread!
Pro Tips For Making Asparagus Bread
- Bloom the Yeast First: Skip mixing yeast directly into flour—it’s a waste of time. Instead, dissolve it in the warm water with a pinch of sugar (about 1 teaspoon) and let it sit for 5-10 minutes until frothy. This guarantees your dough rises properly, and you’ll spot dead yeast early (no bubbles? Start over).
- Soften Butter Properly: Cold butter = dense bread. Warm the unsalted butter in a microwave for 10-15 seconds until it’s soft but not melted (it should dent when pressed). This ensures even distribution in the dough, giving you that tender crumb without greasy pockets.
- Don’t Over-Knead the Dough: I used to think more kneading = better bread. Wrong. Stop when the dough springs back slowly after pressing it (about 8-10 minutes by hand). Overworking it makes gluten tough, and your asparagus bread will turn out chewy instead of light.
- Use Fresh Asparagus Trim: Save the tough ends from your asparagus—blanch them, chop finely, and mix into the dough before the final knead. It adds subtle flavor and texture without extra effort. (Yes, even the scraps belong in the bread.)
Common mistakes when making this recipe
Over-Mixing the Dough
I’ve seen this happen more times than I can count—dough that’s been overworked becomes tough and dense, ruining the light, airy texture we want. Once the herbs are folded in, stop kneading immediately.
The dough should be just combined enough to distribute the dill, chives, and garlic evenly without developing gluten strands. If you’re using a stand mixer, 5-7 minutes on medium speed is plenty. Over-kneading activates too much gluten, which makes the bread chewy rather than tender.
Honestly, this is one of the easiest mistakes to fix—just pay attention to the dough’s texture. 💡
Skipping the Blanch
Raw asparagus in bread dough is a recipe for disaster—it’ll release too much moisture and create a soggy loaf. Always blanch the asparagus for 2 minutes in boiling water before adding it to the dough.
This step removes excess starch and firms up the spears so they hold their shape and texture. I’ve tried skipping it (don’t ask why), and the result was a dense, watery mess.
Pro tip: Use an ice bath to stop the cooking immediately after blanching—this keeps the asparagus bright green and prevents overcooking. ❄️
Incorrect Yeast Activation
Nothing ruins a loaf faster than dead yeast. The water should be 110°F—not too hot, not too cold. If it’s too hot, you’ll kill the yeast; if it’s too cold, it won’t activate properly. I’ve seen people use straight-from-the-tap water or microwave-heated water, both of which can fail.
Test the temperature with your finger—it should feel warm but not hot enough to burn your skin. Once the yeast is sprinkled in, wait 5-7 minutes for it to foam. If it doesn’t, start over with fresh yeast. 🍞
Overloading the Dough
This bread is all about balance—too much asparagus or herbs can weigh down the dough and prevent proper rising. Stick to the 1 lb asparagus and 0.5 cup total herbs measurements.
I’ve experimented with doubling the herbs, and while it sounds like a good idea, the dough becomes dense and the flavors overpower the bread. The asparagus should complement, not dominate. Think of it like seasoning: a little goes a long way. 🌿
Baking Without a Thermometer
I can’t stress this enough—baking bread without an instant-read thermometer is like flying blind. The loaf should reach an internal temperature of 190°F for perfect doneness. Without one, you risk underbaking (which makes the bread gummy) or overbaking (which dries it out).
I use a ThermoWorks Dot because it’s affordable and accurate. If you don’t have one, at least bake until the crust is deep golden brown and the internal temperature is close to 190°F. 🌡️
Ignoring the Second Rise
The second rise is where the magic happens—it’s what gives the bread its final lift and ensures the asparagus stays submerged. Skipping this step or rushing it results in a flat, dense loaf.
Let the dough rise until it’s about halfway up the sides of the pan (about 30-45 minutes). If you’re in a hurry, place the pan in a warm oven with the light on for 10 minutes to jumpstart the rise.
Patience here pays off with a loaf that’s light and airy, not heavy and compact. ⏳
Nutrition facts
Frequently asked questions
Can I use frozen asparagus instead of fresh?
Fresh asparagus is ideal for this recipe because it holds its texture and vibrant color best. However, if you must use frozen, thaw it completely first, then blanch for 3 minutes (instead of 2) to remove excess moisture. Pat it very dry before adding to the dough—this prevents a soggy loaf. For best results, opt for fresh when possible.
How do I store leftover asparagus bread?
Wrap cooled slices tightly in plastic wrap or store in an airtight container for up to 3 days at room temperature. For longer storage, freeze slices before wrapping—this prevents freezer burn. Toast frozen slices directly in the toaster for a crispy texture. The bread also reheats beautifully in a 350°F oven for 5-7 minutes to restore freshness.
What’s the best way to serve this bread?
This herb-infused loaf shines as a side for grilled meats or roasted vegetables, but it’s also perfect for open-faced sandwiches. Try it with smoked salmon, cream cheese, and capers, or simply slather with garlic butter. For a vegetarian option, pair with hummus and sliced cucumbers. The asparagus adds a lovely pop of color to charcuterie boards too!
Can I make this bread without a stand mixer?
Mix the dough by hand in a large bowl using a wooden spoon first, then turn it onto a floured surface and knead for 8-10 minutes by hand. The key is to knead until the dough is smooth and elastic—just like with a mixer. For the braid, divide the dough carefully and roll each piece gently to avoid tearing. Patience is key when shaping by hand.
Why did my asparagus turn gray in the dough?
Gray asparagus usually means it was overcooked during blanching or released too much moisture into the dough. Always blanch for exactly 2 minutes and use an ice bath to stop cooking immediately. Also, pat the asparagus completely dry before adding it to prevent excess water from developing. Freshly blanched asparagus should stay bright green in the dough.