
Desserts
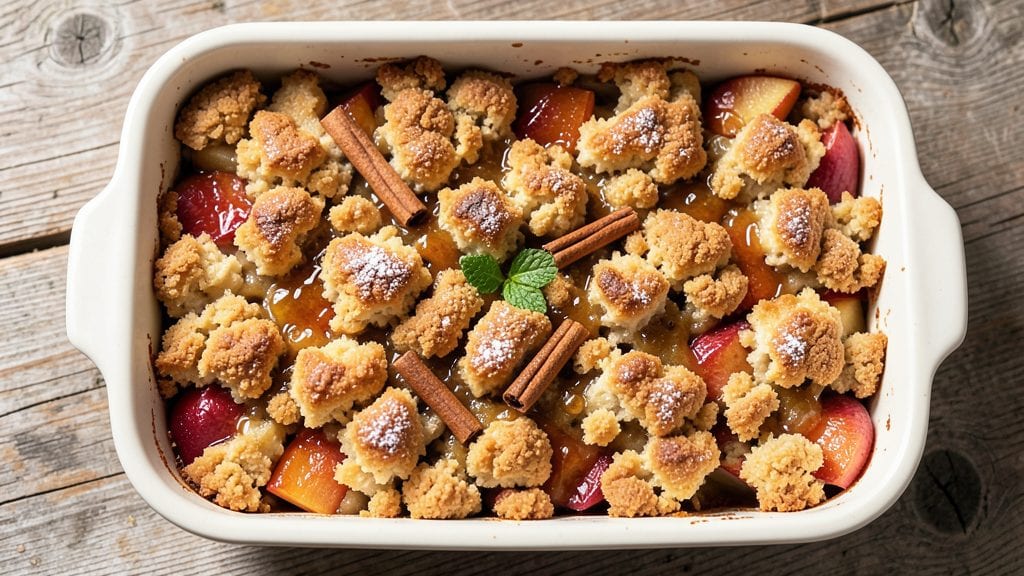
This canned apple cobbler recipe delivers the perfect balance of warm, spiced topping and juicy fruit filling—no fresh apples required. The secret lies in using a simple biscuit crust that stays tender while creating a golden, crackly top, all baked in just 45 minutes.
I developed this version after years of testing, ensuring every bite delivers that comforting mix of cinnamon warmth and tender fruit.
The beauty of this recipe is its simplicity: you'll use pantry staples like canned apples, flour, and butter to create a dessert that tastes homemade without requiring fresh fruit prep. The biscuit topping stays soft and flaky, while the spiced filling releases its juices perfectly when baked.
This is the kind of dessert that transforms a casual dinner into something special with minimal effort.
What you'll end up with is a steaming plate of cobbler—golden-brown topping, juicy apple filling bubbling beneath, and that signature spiced aroma filling your kitchen. The contrast between the tender crust and tender fruit creates an irresistible texture that disappears too quickly.
Serve it warm with a scoop of vanilla ice cream for the ultimate comfort dessert.
This recipe works equally well for weeknight dinners or holiday gatherings, and leftovers reheat beautifully. The biscuit topping can be swapped for a cake-style crust if you prefer a different texture. Let's get baking—your kitchen will smell like autumn in no time.
Ingredients for canned apple cobbler
Pantry staples transform into golden, spiced cobbler with just 12 ingredients.
| Ingredient | Amount | Notes |
|---|---|---|
| Canned Apple Pie Filling 🍎 | 2 cans | Unsweetened, 29 oz each |
| All-Purpose Flour 🌾 | 2 cups | Sifted for light texture |
| Granulated Sugar 🍚 | ¾ cup | Plus 2 tbsp for filling |
| Unsalted Butter 🧈 | ¾ cup | Cold, cubed for biscuit |
| Baking Powder 🍞 | 2 tbsp | Aluminum-free preferred |
| Ground Cinnamon 🌿 | 2 tbsp | Plus 1 tbsp for filling |
| Ground Nutmeg 🌿 | ½ tsp | Freshly grated preferred |
| Salt 🧂 | ½ tsp | Fine sea salt |
| Milk 🥛 | 1 cup | Whole milk for richness |
| Vanilla Extract 🍯 | 1 tsp | Pure vanilla preferred |
| Brown Sugar 🍚 | ¼ cup | Packed, for filling |
| Lemon Juice 🍋 | 1 tbsp | Freshly squeezed |
The canned apple filling is the heart of this recipe—unsweetened is key—it keeps the dessert from being too cloying. I grab Libby's or Muir Glen from the store, but any unsweetened brand works. For the spices, Penzeys or bulk bins give the freshest flavor, but the grocery store stuff is fine. The cinnamon is non-negotiable—it's what gives that signature warmth. If you're using pre-made pie filling, skip the extra sugar and lemon juice in the filling since it's already sweetened.
No baking powder? Self-rising flour plus 1/4 tsp salt works in a pinch. Short on butter? Coconut oil or lard keeps the crust flaky, though butter's flavor can't be beat. The milk can be swapped for buttermilk if you've got it—just add 1 tsp vinegar to regular milk and let it sit. For the filling, if you want extra zing, add a pinch of cayenne or cardamom. The filling can be prepped a day ahead and stored in the fridge, saving you time on baking day.
This cobbler reheats beautifully—just pop it in a 350°F oven for 10 minutes to warm through. Keeps for 4 days in the fridge, though it's best served fresh. For make-ahead baking, assemble the cobbler, refrigerate overnight, then bake straight from the fridge—it bakes through evenly. The biscuit topping stays soft for 3 days if stored in an airtight container, but honestly, it disappears faster than that.
Why You'll Love This Recipe
- Four-Ingredient Magic: The pantry already has what you need—no specialty shopping, no last-minute grocery runs. Just open that can of pie filling, mix a few dry staples, and you’re golden.
- Caramelized Crunch: That crispy butter-topped crust meets the spiced apples—it’s like dessert hugs you. Honestly, the first bite makes you forget it’s basically a shortcut.
- Weeknight Crowd-Pleaser: Serve it warm for dinner with vanilla ice cream, or pack slices for lunch. My kids grab it straight from the fridge, and my husband saves the leftovers for breakfast.
- Budget-Friendly Comfort: Uses basic ingredients that won’t break the bank, and one batch stretches for days. Between us, this is the recipe I make when I’m tired of takeout but still want something special.
Step-by-step instructions for juicy canned apple cobbler
Here's how to create a perfectly balanced cobbler with a crisp topping and juicy filling every time.
Prepare the Enhanced Apple Filling
In a medium bowl, combine the 2 cans of unsweetened canned apple pie filling with the 0.25 cup packed brown sugar, 1 tablespoon freshly squeezed lemon juice, and 1 tablespoon ground cinnamon. Stir until everything is evenly distributed. This extra cinnamon and lemon brightens the filling and cuts through the natural sweetness of the canned apples.
The lemon juice is especially important—it prevents the filling from becoming too syrupy as it bakes. You want the filling to stay juicy, not watery. Give it a taste at this stage to adjust sweetness if needed, though the brown sugar should complement the filling perfectly. Transfer the mixture to a 9x13-inch baking dish and spread it evenly, creating a smooth layer about ½-inch thick.
Make the Spiced Cobbler Topping
In a large bowl, whisk together the 2 cups sifted all-purpose flour, 0.75 cup granulated sugar, 2 tablespoons baking powder, 0.5 teaspoon salt, 0.5 teaspoon ground nutmeg, and 2 tablespoons ground cinnamon. This dry mixture is the foundation of your crisp topping. Make sure all the ingredients are evenly distributed—you should see small specks of cinnamon and nutmeg throughout.
Cut in the 0.75 cup cold, cubed unsalted butter using a pastry cutter or your fingers until the mixture resembles coarse crumbs with pea-sized butter pieces remaining. The butter should be cold but not frozen—this ensures your topping stays crisp rather than turning greasy. If the mixture looks too shaggy, press it together gently with your fingers to form a rough dough.
Combine Wet Ingredients for the Topping
In a separate bowl, whisk together the 1 cup milk, 1 teaspoon vanilla extract, and 1 tablespoon lemon juice. This liquid mixture will bind your topping together while keeping it tender. The lemon juice here adds a subtle brightness that complements the cinnamon and apple filling.
Gradually add the wet ingredients to the dry mixture, stirring just until combined. You want to mix until the dough comes together, but don't overwork it—this can make the topping dense. The dough should hold together when pressed gently, but still look slightly crumbly. If it seems too dry, add 1 teaspoon more milk at a time until it reaches the right consistency.
Assemble and Bake the Cobbler
Carefully spoon the cobbler topping mixture over the prepared apple filling in the baking dish. Use a spatula to spread it evenly, creating peaks and valleys for that classic cobbler look. The topping should cover the entire filling but doesn't need to be perfectly smooth—some texture is good.
Bake in a preheated 375°F oven for 35-40 minutes, until the topping is golden brown and the filling is bubbling vigorously. The edges should be crisp while the center remains slightly soft—this ensures that juicy texture we're after. You'll know it's ready when the topping pulls away slightly from the edges of the pan.
Rest and Serve for Maximum Juiciness
Remove the cobbler from the oven and let it rest for 10-15 minutes before serving. This resting period allows the juices to redistribute throughout the filling, preventing them from pooling at the bottom of the dish. The topping will firm up slightly as it cools, but it should still be tender and crispy.
Serve warm with a scoop of vanilla ice cream or a dollop of whipped cream. The contrast between the warm, spiced cobbler and cold ice cream makes this dessert truly special. Each bite should deliver that perfect balance of crisp topping and juicy, flavorful apple filling—exactly what you promised yourself when you started this recipe.
Pro Tips For Making Canned Apple Cobbler
- Preheat Like a Pro: Crank your oven to 375°F and let it blaze for at least 15 minutes before baking—this ensures the crust browns evenly and doesn’t steam like sad, pale dough. I learned this the hard way after pulling out a cobbler that looked more like a biscuit than a golden masterpiece.
- Drain the Filling: Open that can of apple pie filling and drain most of the liquid—about 2/3 of it—before spooning it into the pan. Too much syrup turns your cobbler into a soggy mess, and nobody wants that. (Yes, even if you’re impatient like me.)
- Cut Cold Butter: Chill your butter for 20 minutes before cutting it into the flour mixture—this keeps the dough from turning into a greasy blob. I used to skip this, and my crusts always ended up greasy instead of flaky. Trust the process.
- Skip the Overmixing: Stir the flour, sugar, and baking powder together just until combined—lumps are fine, but don’t turn it into pancake batter. Overmixing makes the crust tough, and nobody wants a cobbler that fights back. Less effort, better texture.
Pro cooking tips for canned apple cobbler
Butter Temperature Matters
Your topping's crispiness depends entirely on the butter's temperature. Use cold, cubed butter straight from the fridge—never softened or melted. I cube mine into ½-inch pieces for even distribution.
If your butter feels too soft, chill the dough for 15 minutes before baking. This prevents a greasy topping and ensures that perfect crackly texture we all love. 🧈
Prevent Overmixing
Once you add the wet ingredients, stop mixing the second the dough comes together. Overmixing develops gluten, which makes your topping tough instead of tender. I use a spatula to gently fold everything just until combined—about 10-12 strokes max. The dough should look shaggy but hold when pressed.
If it crumbles apart, add 1 teaspoon milk at a time until it binds. 🌾
Even Filling Distribution
Spread your apple filling in a smooth, even layer—about ½-inch thick—to ensure consistent baking. Use a rubber spatula to press it gently into the corners of your 9x13-inch baking dish.
This prevents soggy spots and lets the topping bake evenly. I tap the dish lightly on the counter to settle the filling before adding the topping. 🍎
Baking Time Troubles
If your cobbler's edges brown too quickly but the center stays undercooked, tent it with aluminum foil after 20 minutes. This traps heat while protecting the topping from over-browning.
For a 350°F oven, add 5-10 extra minutes if your topping needs more color. Always check for doneness at 35-40 minutes—the filling should bubble vigorously. 🌡️
Resting Prevents Sogginess
Never skip the 10-15 minute rest after baking! This lets the juices redistribute, keeping your filling luscious and preventing a watery texture. I place my cobbler on a wire rack to cool slightly while resting—this also prevents condensation from steaming the topping. Serve immediately for the crispiest results. ⏰
Oven Rack Placement
Position your baking dish on the middle rack of your oven for even heat distribution. The middle rack ensures the topping browns evenly without burning. If your oven runs hot, lower it to the lower-middle rack after 20 minutes to prevent over-browning.
I always preheat for 15 minutes to guarantee consistent results. 🔥
Nutrition facts
Frequently asked questions
Can I use sweetened canned apples instead of unsweetened?
Yes, but you'll need to adjust the sugar in the filling. Sweetened filling already contains sugar, so skip the 0.25 cup brown sugar and 2 tbsp cinnamon in the recipe. Taste the filling before baking—it should be slightly sweet but not cloying. The lemon juice still helps balance the flavor.
How do I make this cobbler without baking powder?
Use 2 teaspoons baking soda plus 1 teaspoon cream of tartar as a substitute, or swap in 2 cups self-rising flour plus ¼ teaspoon salt. The texture will be slightly different but still delicious. For extra lift, whisk the dry ingredients vigorously before mixing with wet ingredients.
Can I make this cobbler in a different-sized pan?
Yes, but adjust baking time accordingly. For an 8x8-inch pan, bake 30-35 minutes—the smaller surface area concentrates heat. For a 9x13-inch pan, use the original 35-40 minutes. If using a 7x11-inch pan, reduce filling to 1 can and bake 25-30 minutes. Always check for doneness when the topping is golden.
Why did my cobbler turn out dense instead of crisp?
Overmixing the topping or using warm butter are the most common causes. Keep butter cold and mix just until combined (about 10-12 strokes). Also, ensure your baking powder is fresh—old baking powder loses lift. For extra crispiness, chill the dough 15 minutes before baking.
Can I make this cobbler ahead of time?
Assemble the cobbler in the baking dish, cover tightly with plastic wrap, and refrigerate up to 24 hours. Bake straight from the fridge (no need to preheat longer). For make-ahead baking, preheat oven to 375°F and bake 5-10 minutes longer than usual. The cold start helps prevent over-browning.